
Linux Navigation for Beginners: Master cd, mkdir and tree
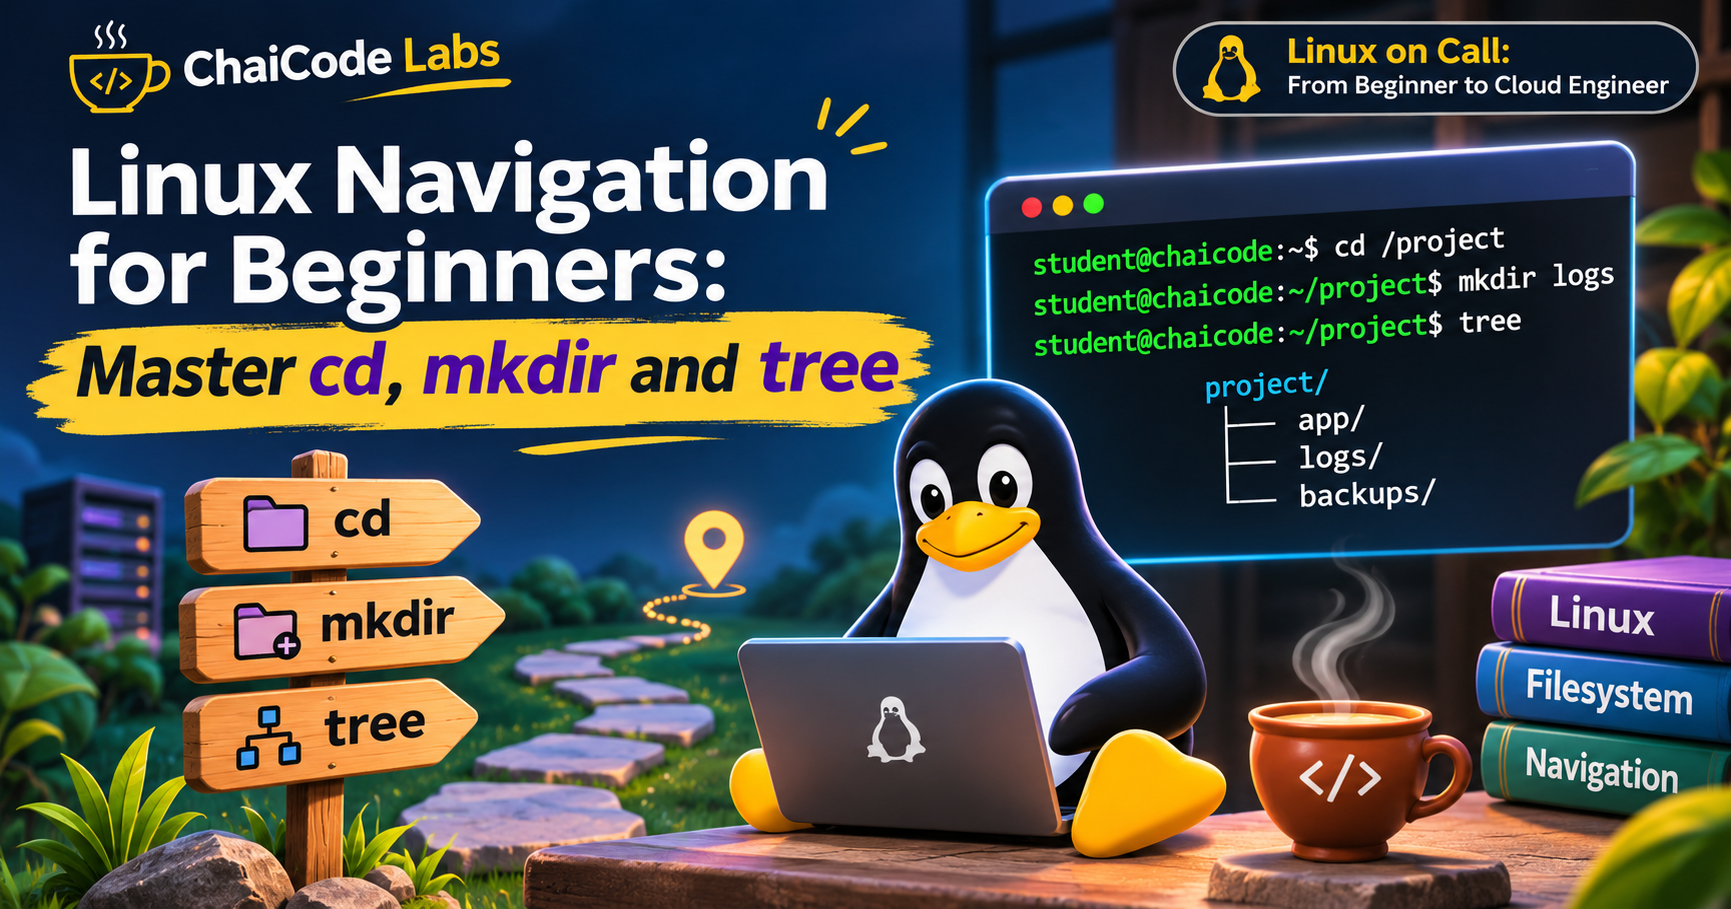
One wrong directory can turn the right Linux command into the wrong result.
Imagine this.
You're responsible for a Linux server running Tapri's ordering application.
The previous administrator, Arjun, has left an archive containing an important masala chai recipe. A new cook needs the recipe's secret ingredient.
Sounds simple, right?
Except there's a problem.
The archive contains multiple recipes, including an outdated version from 2024.
Choose the wrong directory, and you could retrieve the wrong ingredient.
Meanwhile, Kabir needs a proper directory structure for the next application release, including dedicated locations for application files, logs, and backups.
You have two jobs:
Find the right information.
Put the right files in the right places.
And there's no graphical file explorer to help.
Just a Linux terminal.
This is where knowing Linux commands becomes different from understanding Linux.
In Chapter 1, we learned how to inspect our environment using pwd, whoami, ls, cat, and echo.
Now, in Chapter 2 of the ChaiCode Labs Linux on Call series, we're going a step further.
We're learning how to navigate the filesystem, build directory structures, and control exactly where files are saved.
Hands-on lab: Chapter 2 — Moving Around
Series: Linux on Call: From Beginner to Cloud Engineer | ChaiCode Labs
1. cd: The Linux Command That Takes You Anywhere
The first command every Linux beginner should understand is:
cd
It stands for Change Directory.
Think of the Linux filesystem as a building.
Each directory is a room.
A path tells you how to reach a room.
And cd is how you walk there.
Let's start with an example:
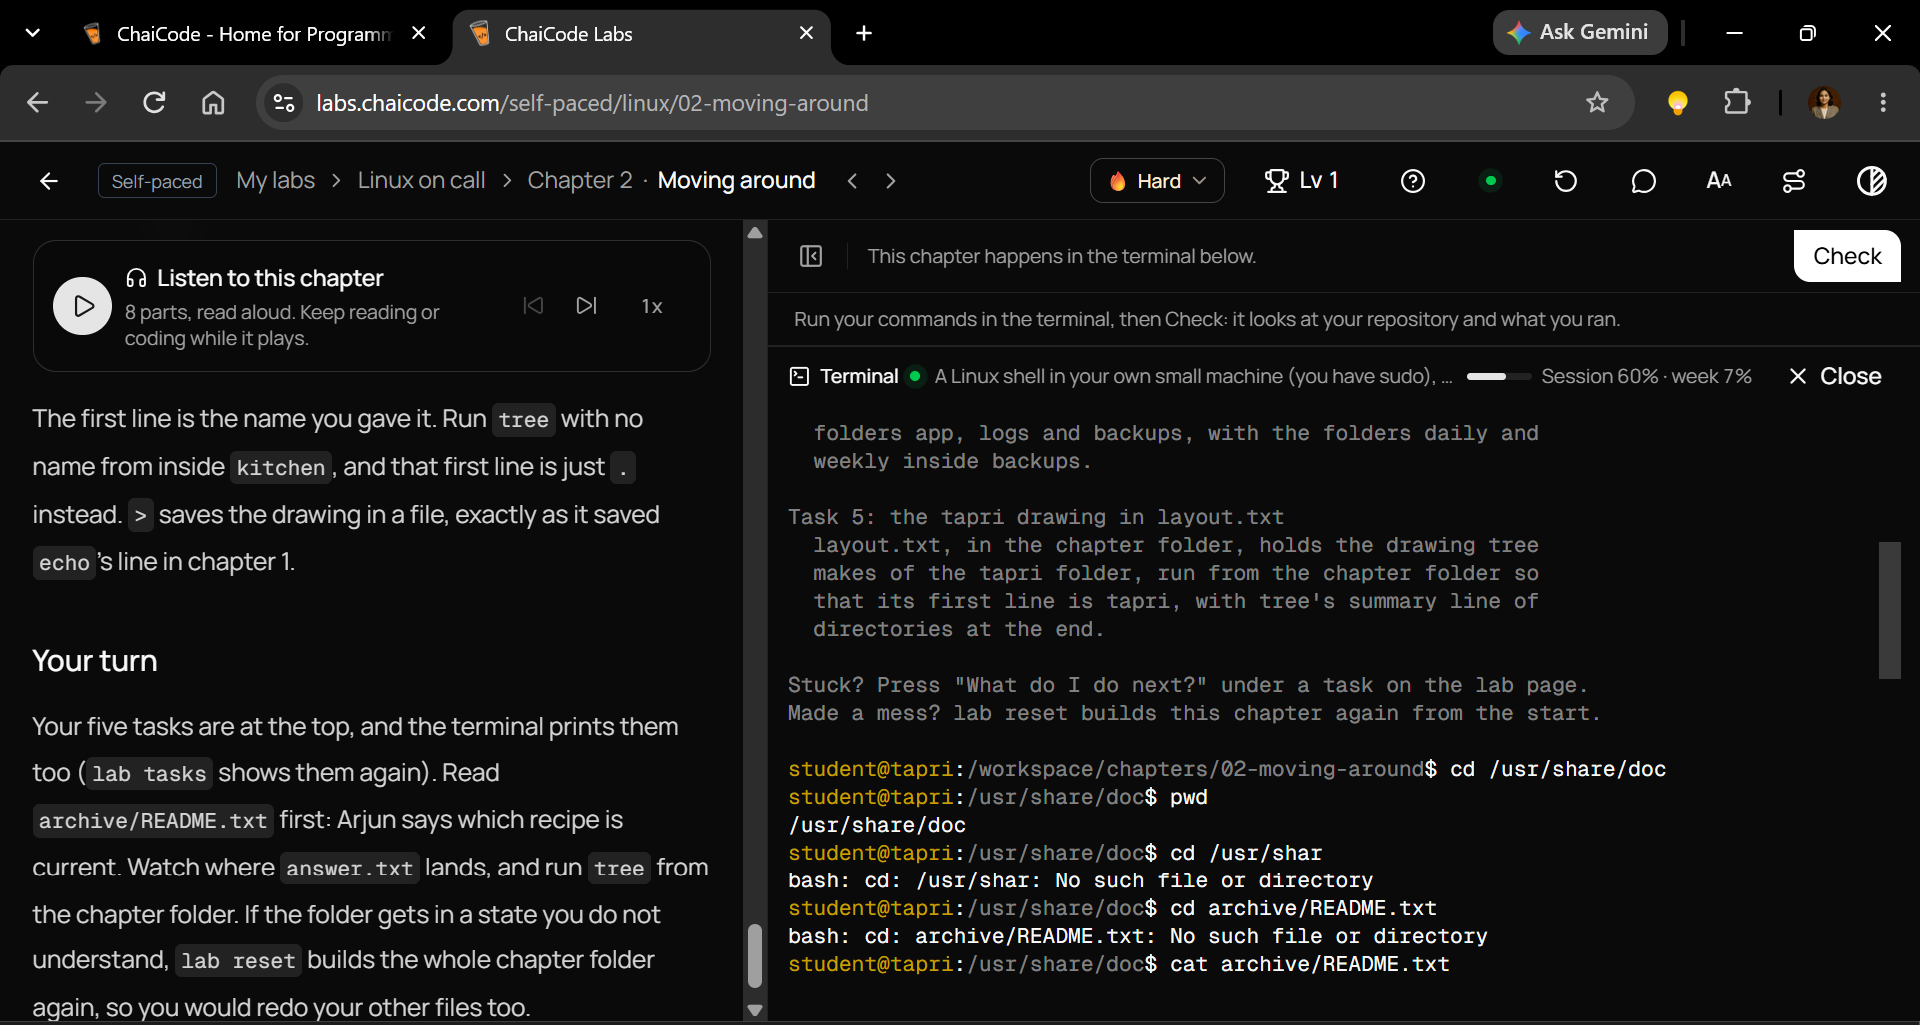
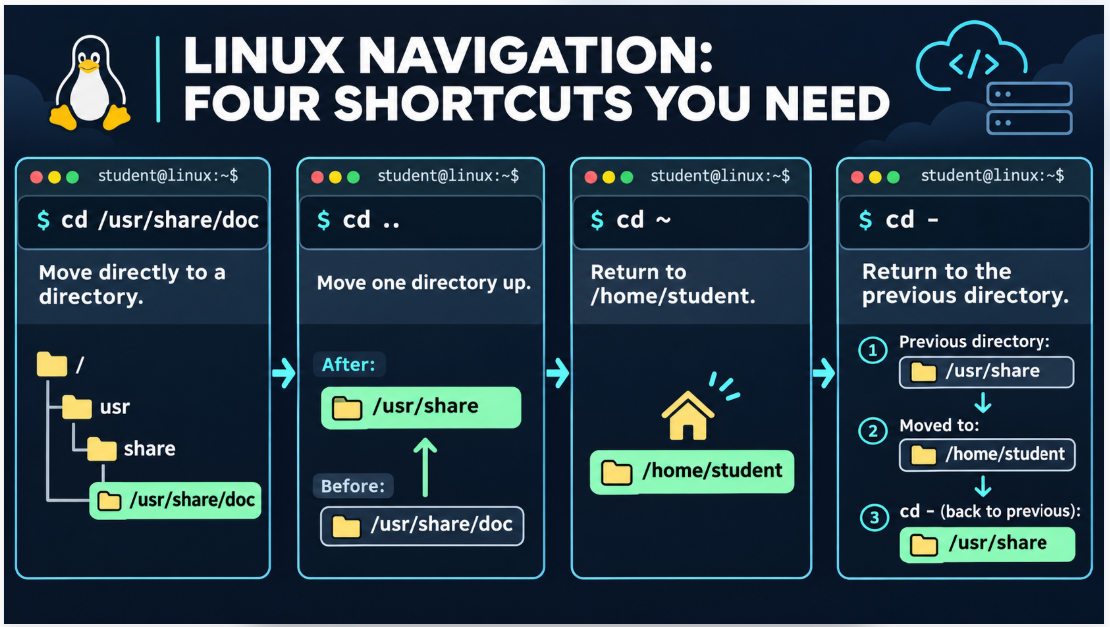
cd /usr/share/doc
Now check your location:
pwd
Output:
/usr/share/doc
You've successfully moved into the /usr/share/doc directory.
Notice something important.
cd changes your working directory.
pwd tells you where you ended up.
They work together.
What happens if you enter the wrong path?
Try:
cd /usr/shar
If that directory doesn't exist, Bash responds:
bash: cd: /usr/shar: No such file or directory
Your current directory remains unchanged.
Now try changing into a regular file:
cd archive/README.txt
Assuming that file exists, you'll receive:
bash: cd: archive/README.txt: Not a directory
Why?
Because cd moves into directories, not ordinary files.
To read the README, you would use:
cat archive/README.txt
Linux lesson: A path can point to either a file or a directory. The command you choose determines what you can do with it.
2. Stop Typing Long Paths: Master Linux Navigation Shortcuts
Here's something beginners discover quickly.
Typing a complete Linux path every time is exhausting.
Imagine repeatedly entering:
/workspace/chapters/02-moving-around/archive/...
One typo and the command fails.
Fortunately, Linux provides shortcuts.
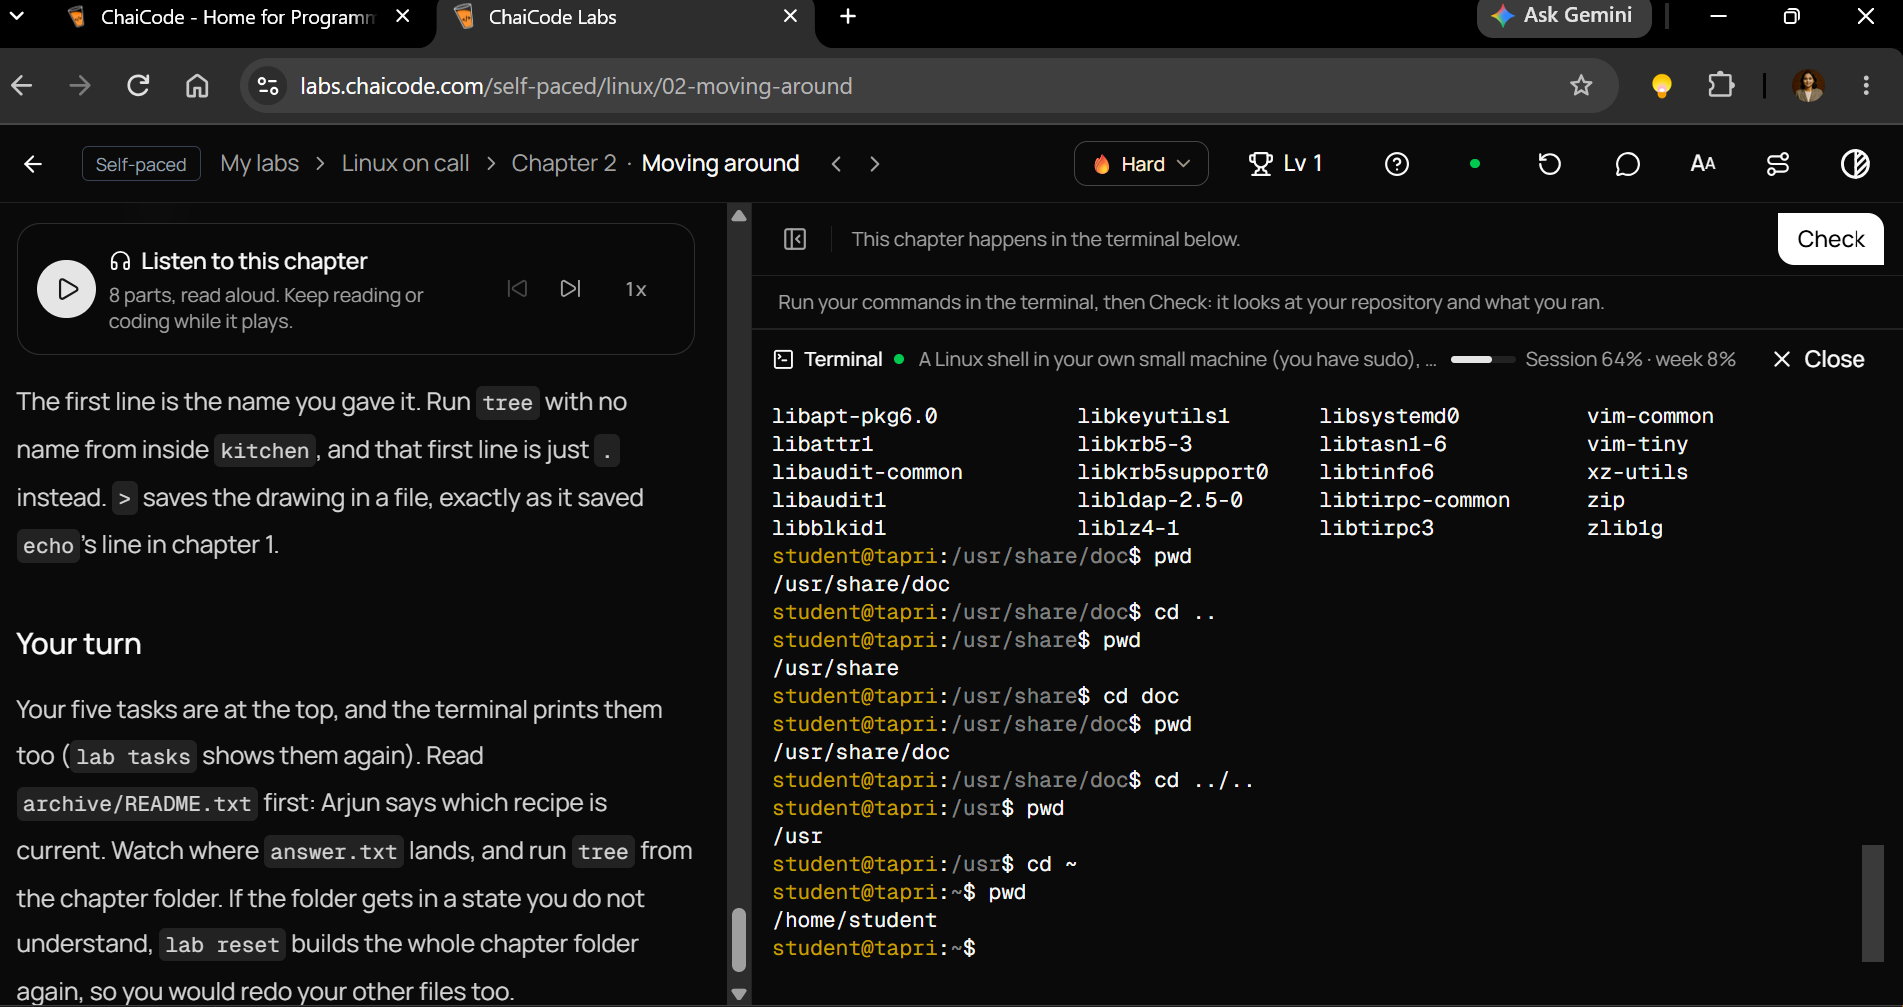
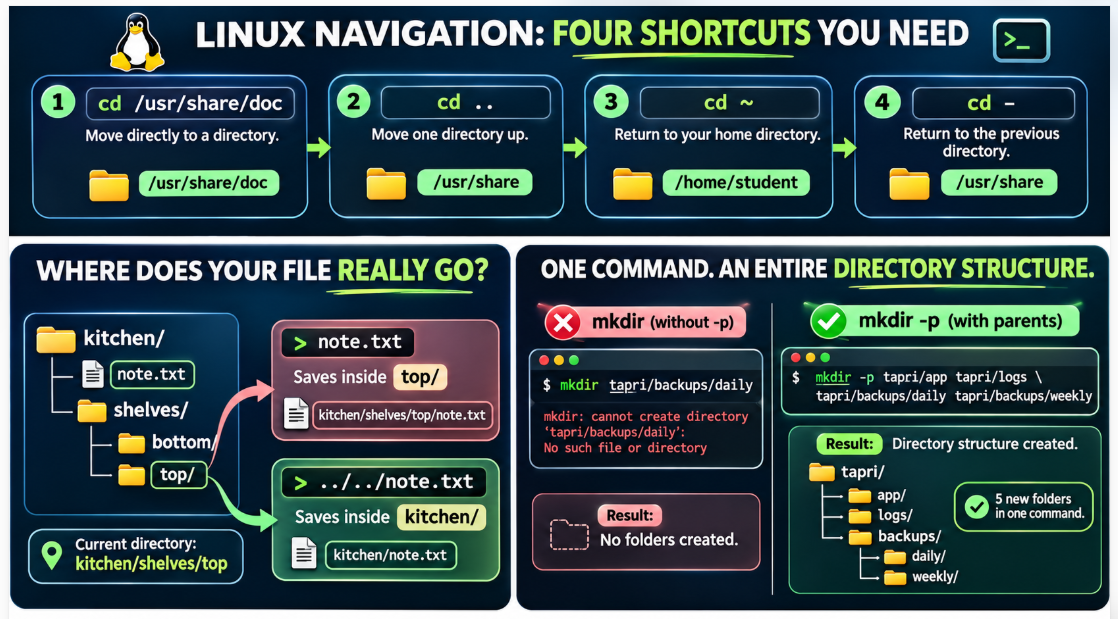
Shortcut 1: cd .. — Move One Directory Up
Suppose you're currently here:
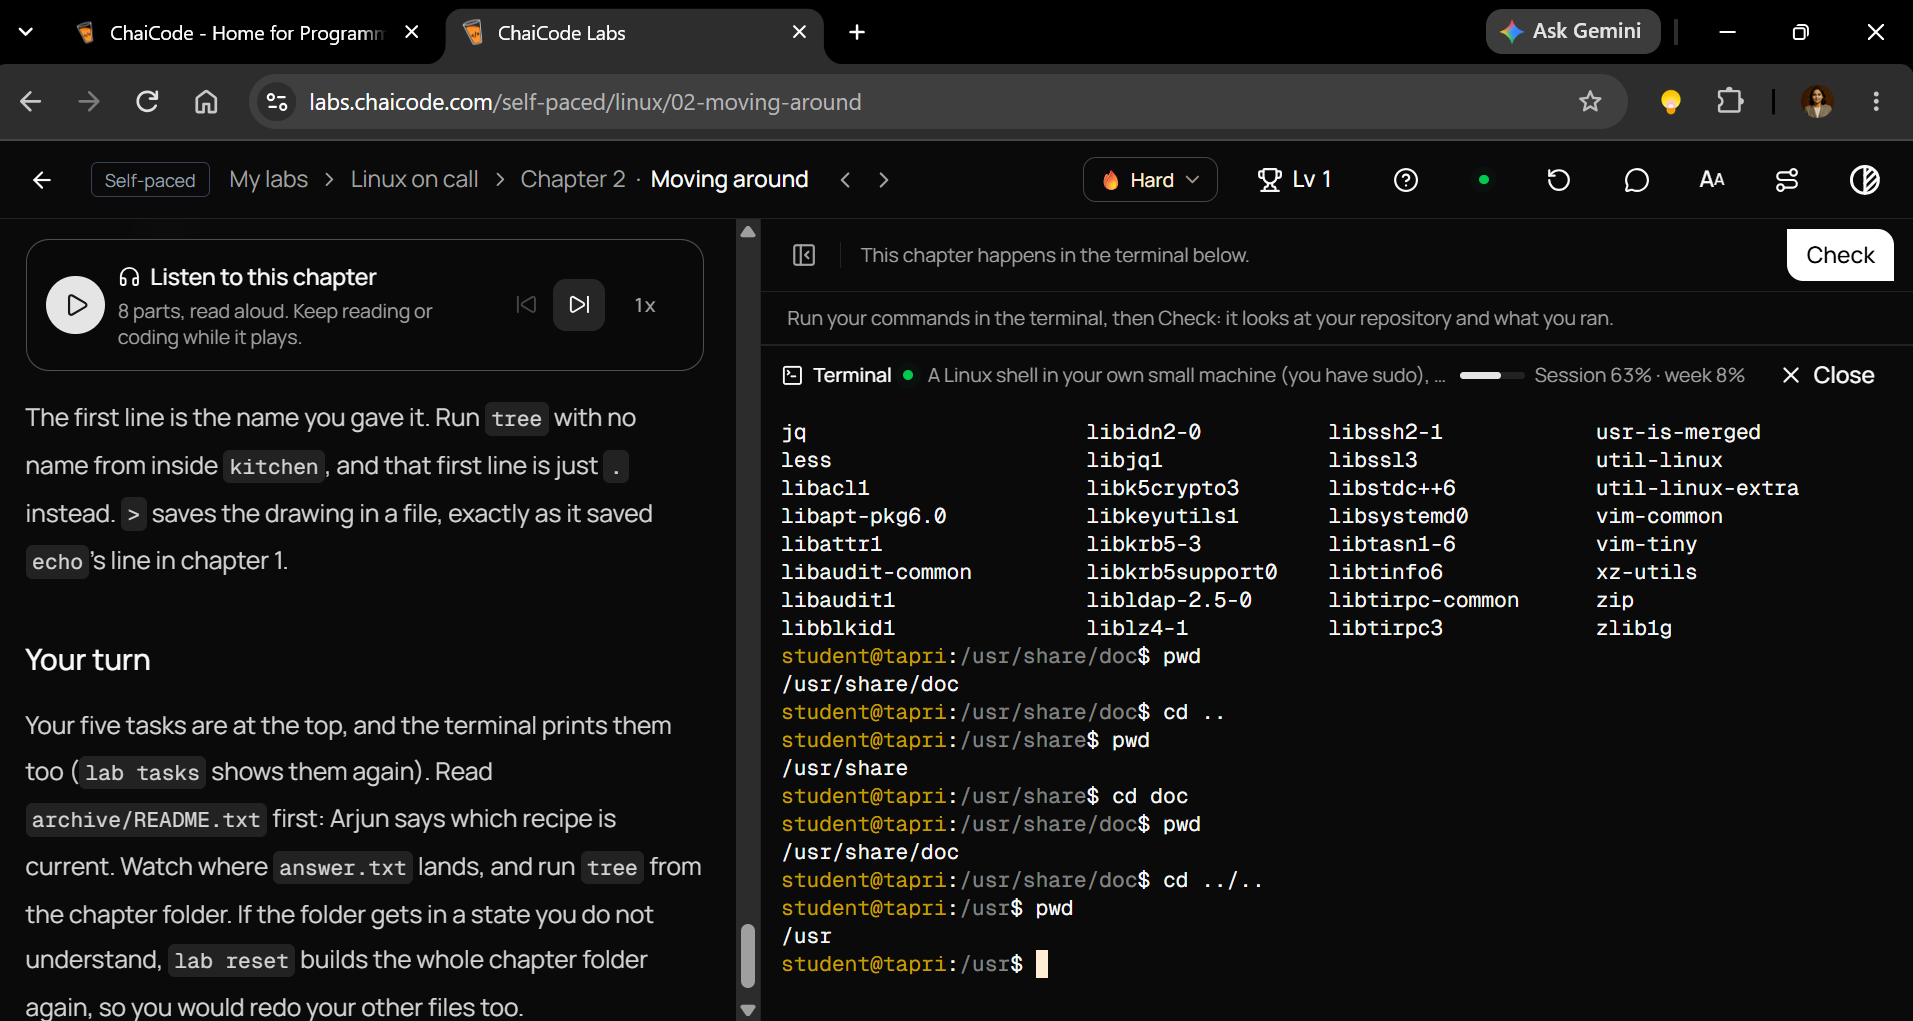
/usr/share/doc
Run:
cd ..
pwd
Output:
/usr/share
You've moved up one directory.
The two dots (..) represent the parent directory.
Want to move up two levels?
cd ../..
pwd
Starting from /usr/share/doc, this takes you to:
/usr
The concept is simple:
.. means one level up.
../.. means two levels up.
And ../../.. means three levels up.
This is particularly useful when navigating deeply nested project directories.
Shortcut 2: cd ~ — Return Home
Every Linux user normally has a home directory.
In the ChaiCode lab, the student account's home directory is:
/home/student
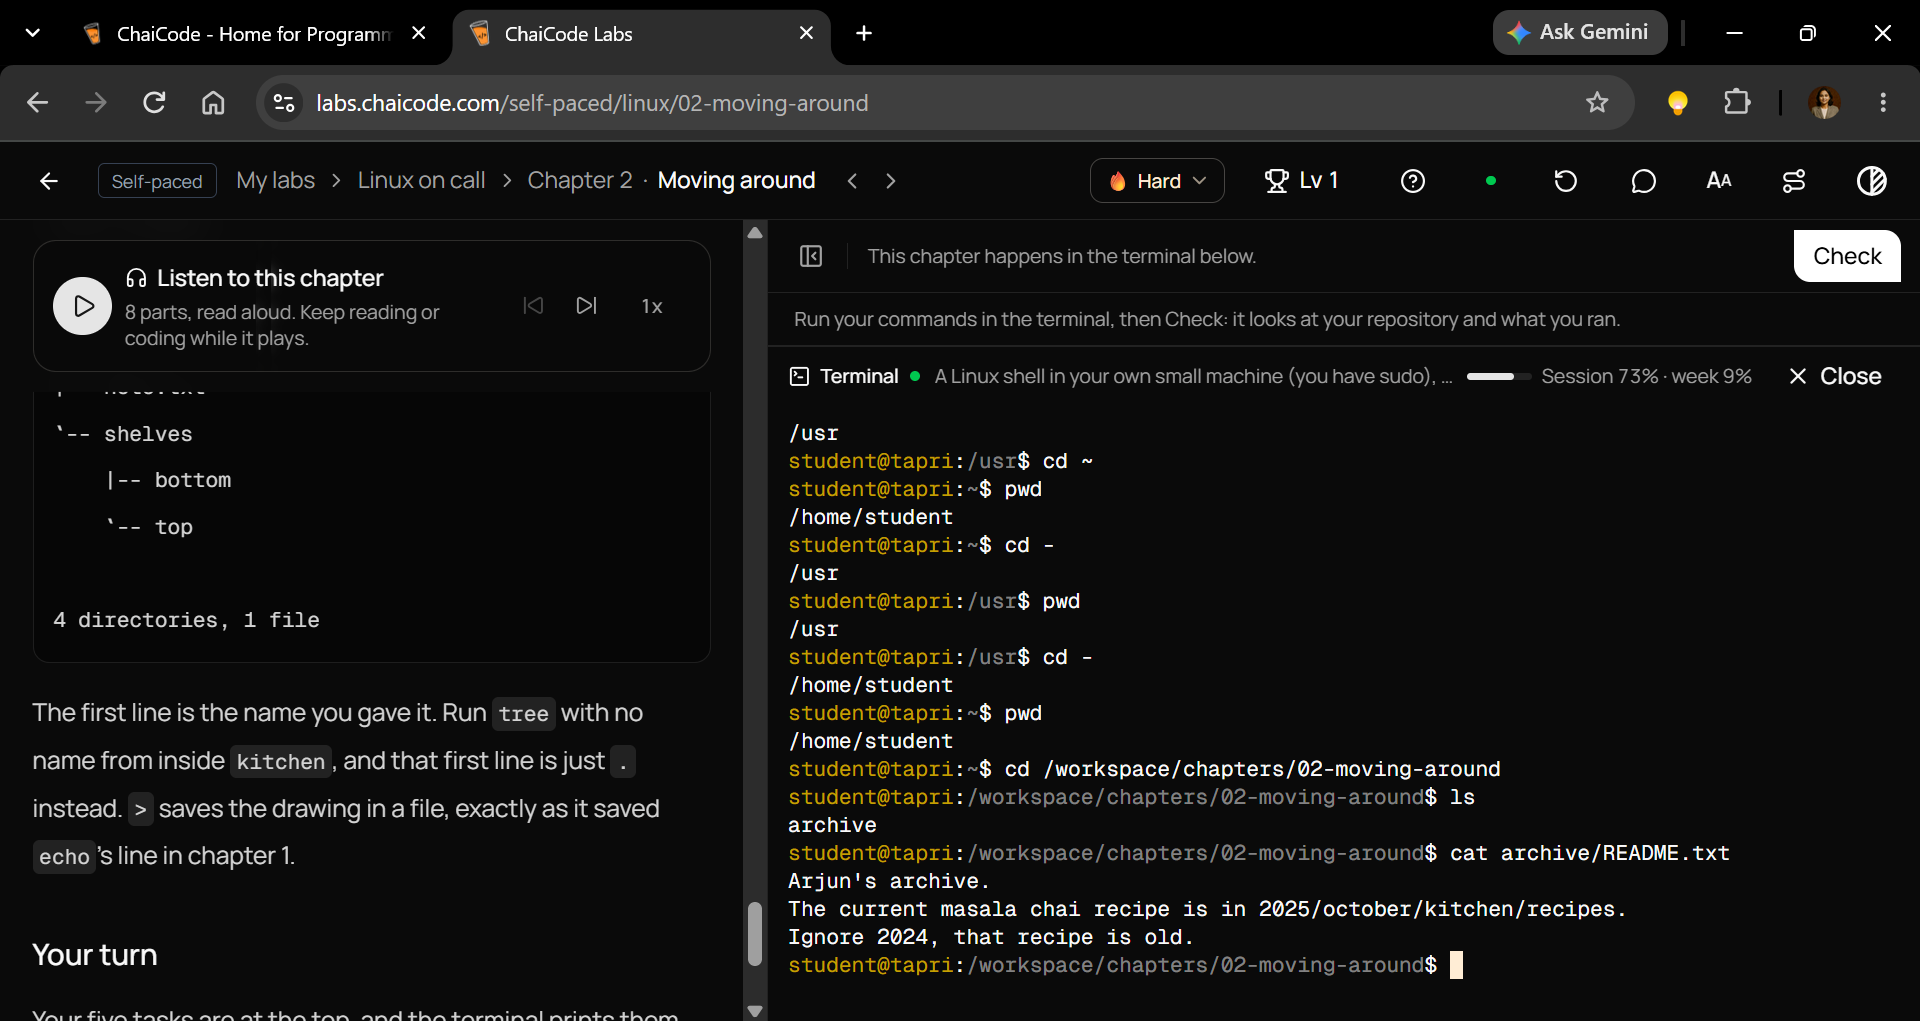
No matter where you are, run:
cd ~
pwd
Output:
/home/student
You can achieve the same result using:
cd
Without a directory argument, cd takes you home.
Think of it as your default starting location.
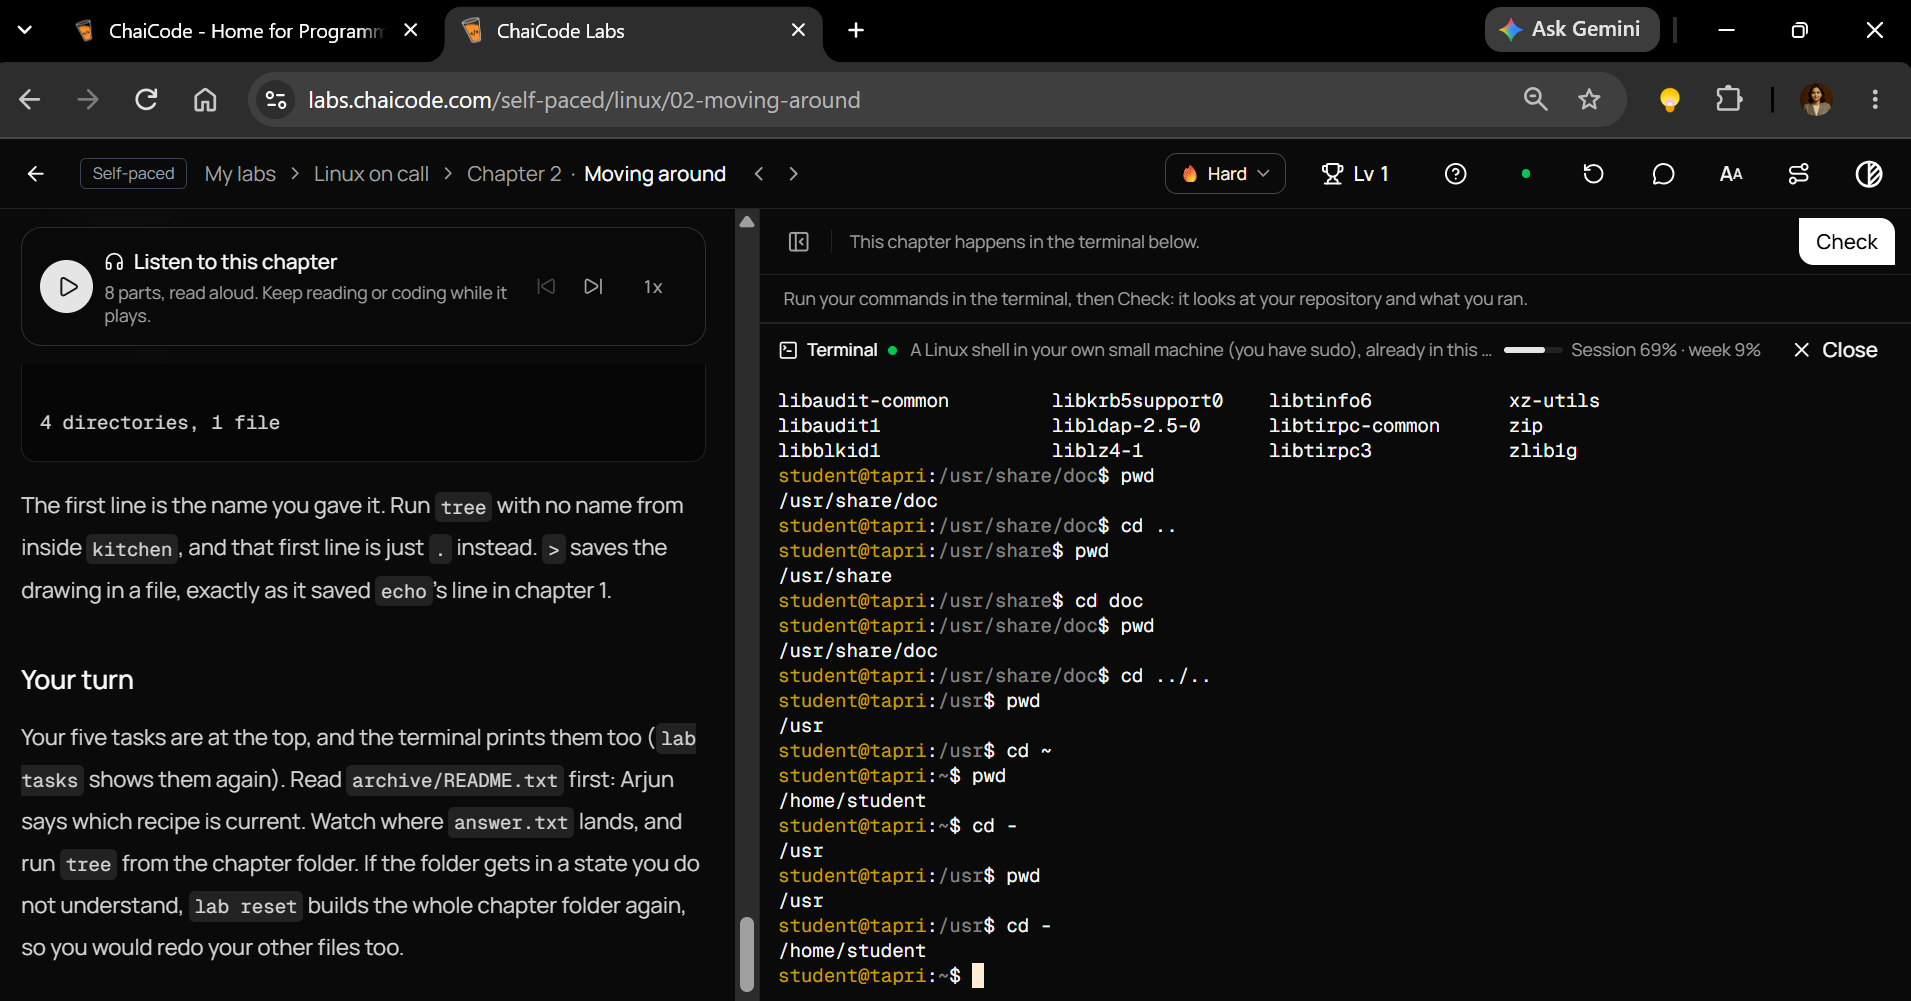
Shortcut 3: cd - — Return to Your Previous Directory
This is one of my favorite Linux navigation tricks.
Imagine you're working in:
/usr/share
You move home:
cd ~
Now you need to return to your previous location.
Instead of typing the complete path, run:
cd -
Output:
/usr
You're back.
The interesting part?
Run it again:
cd -
You'll return to:
/home/student
The two locations swap.
Important: cd - returns to your immediately previous working directory. It doesn't take you through your entire navigation history.
Bash uses the previous working directory, stored in OLDPWD, for this behavior.
That's why the following sequence is worth understanding:
cd /usr/share/doc
cd ..
cd ~
cd -
The final command returns you to:
/usr/share
Not /usr/share/doc.
Because /usr was where you stood immediately before going home.
The takeaway: Don't memorize long paths when the shell can help you navigate.
3. The Tab Key: A Small Shortcut That Saves Time
There's another Linux productivity trick hiding on your keyboard.
Tab completion.
Instead of typing:
cd /usr/share/
Start typing:
cd /usr/sh
Press Tab.
If the path has one unambiguous completion, Bash can complete it for you:
cd /usr/share/
If multiple possible matches exist, pressing Tab twice can display the available choices.
This reduces typing and helps prevent errors.
It's especially useful when navigating long directory names, application folders, and nested project structures.
In real infrastructure work, a small reduction in typing mistakes can save a surprising amount of troubleshooting time.
Cloud Ops takeaway: Command-line efficiency isn't about typing faster. It's about reducing unnecessary work and avoidable errors.
4. The Recipe Hunt: Finding the Right File in a Linux Archive
Now it's time to apply these concepts to the actual lab.
The new cook needs Arjun's current masala chai recipe.
But there's an outdated recipe from 2024.
Selecting the wrong one means retrieving outdated information.
The lab provides a clue:
archive/README.txt
Your first step shouldn't be guessing which recipe is current.
It should be reading the handover information.
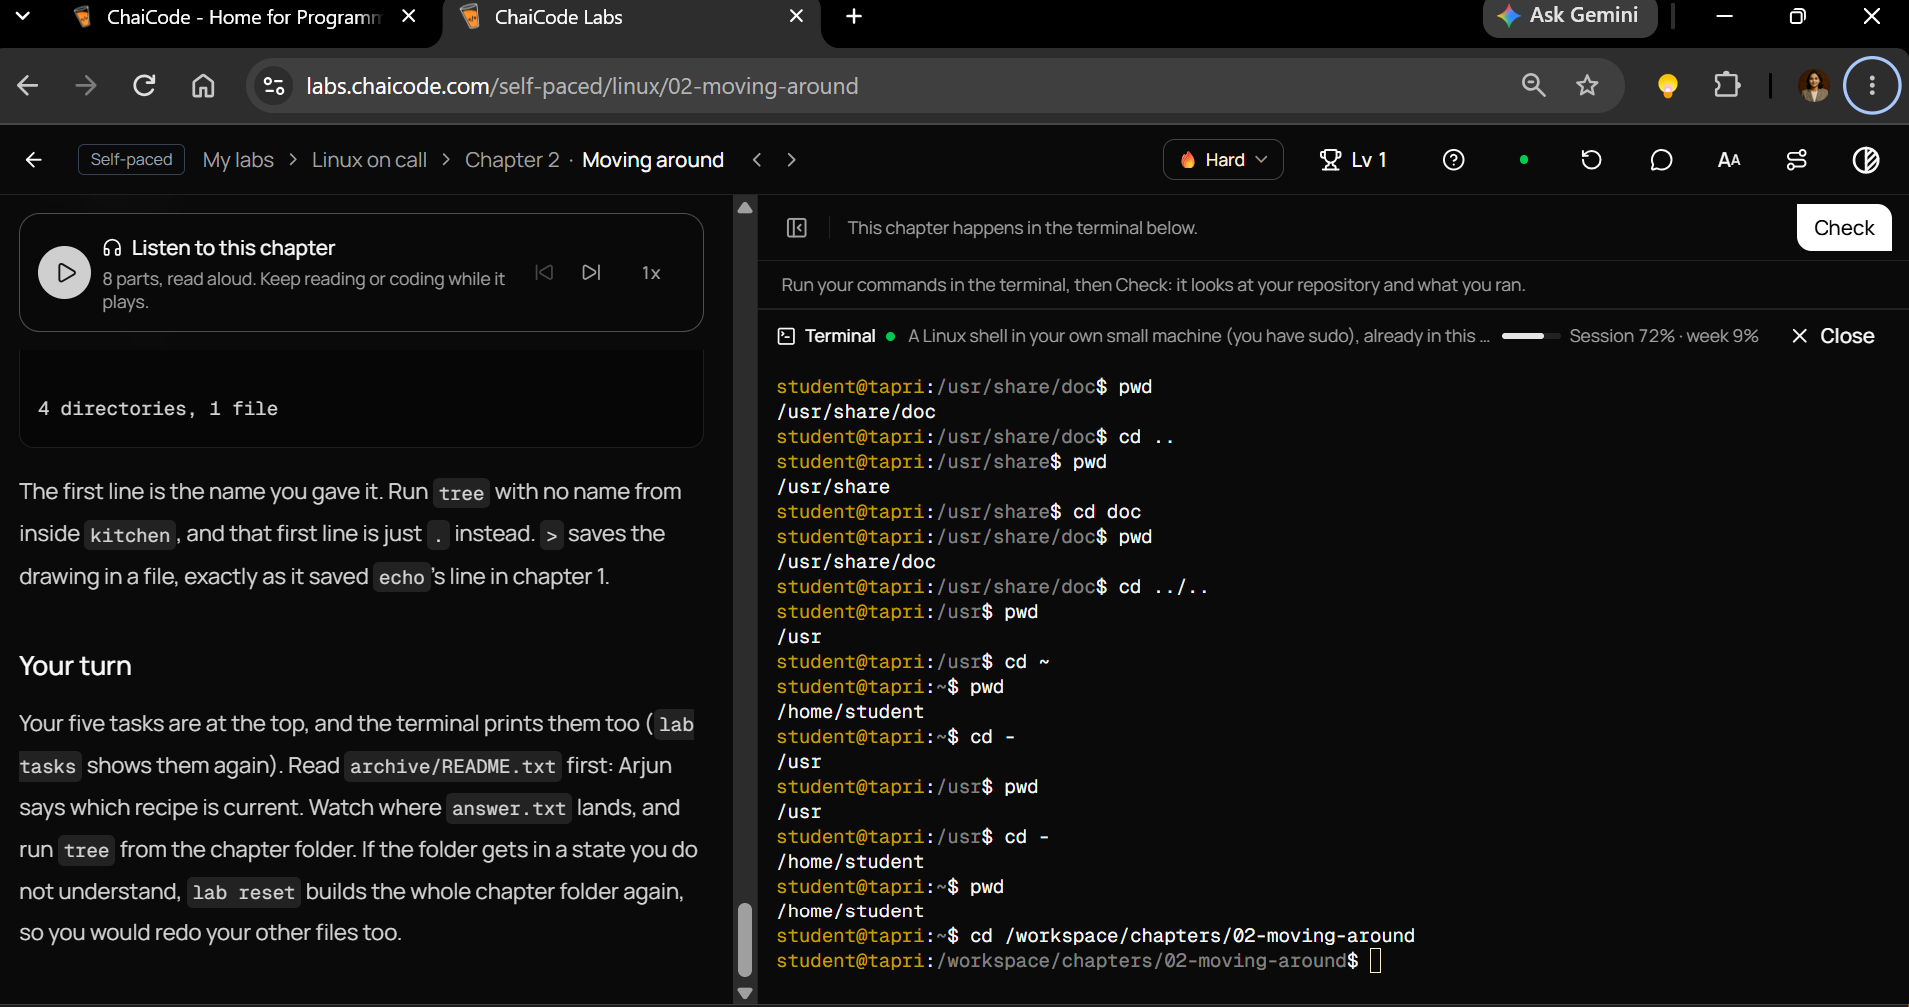
Step 1: Start in the Chapter Directory
Run:
pwd
Expected location:
/workspace/chapters/02-moving-around
If you're somewhere else, navigate back:
cd /workspace/chapters/02-moving-around
Step 2: Read the Archive Instructions
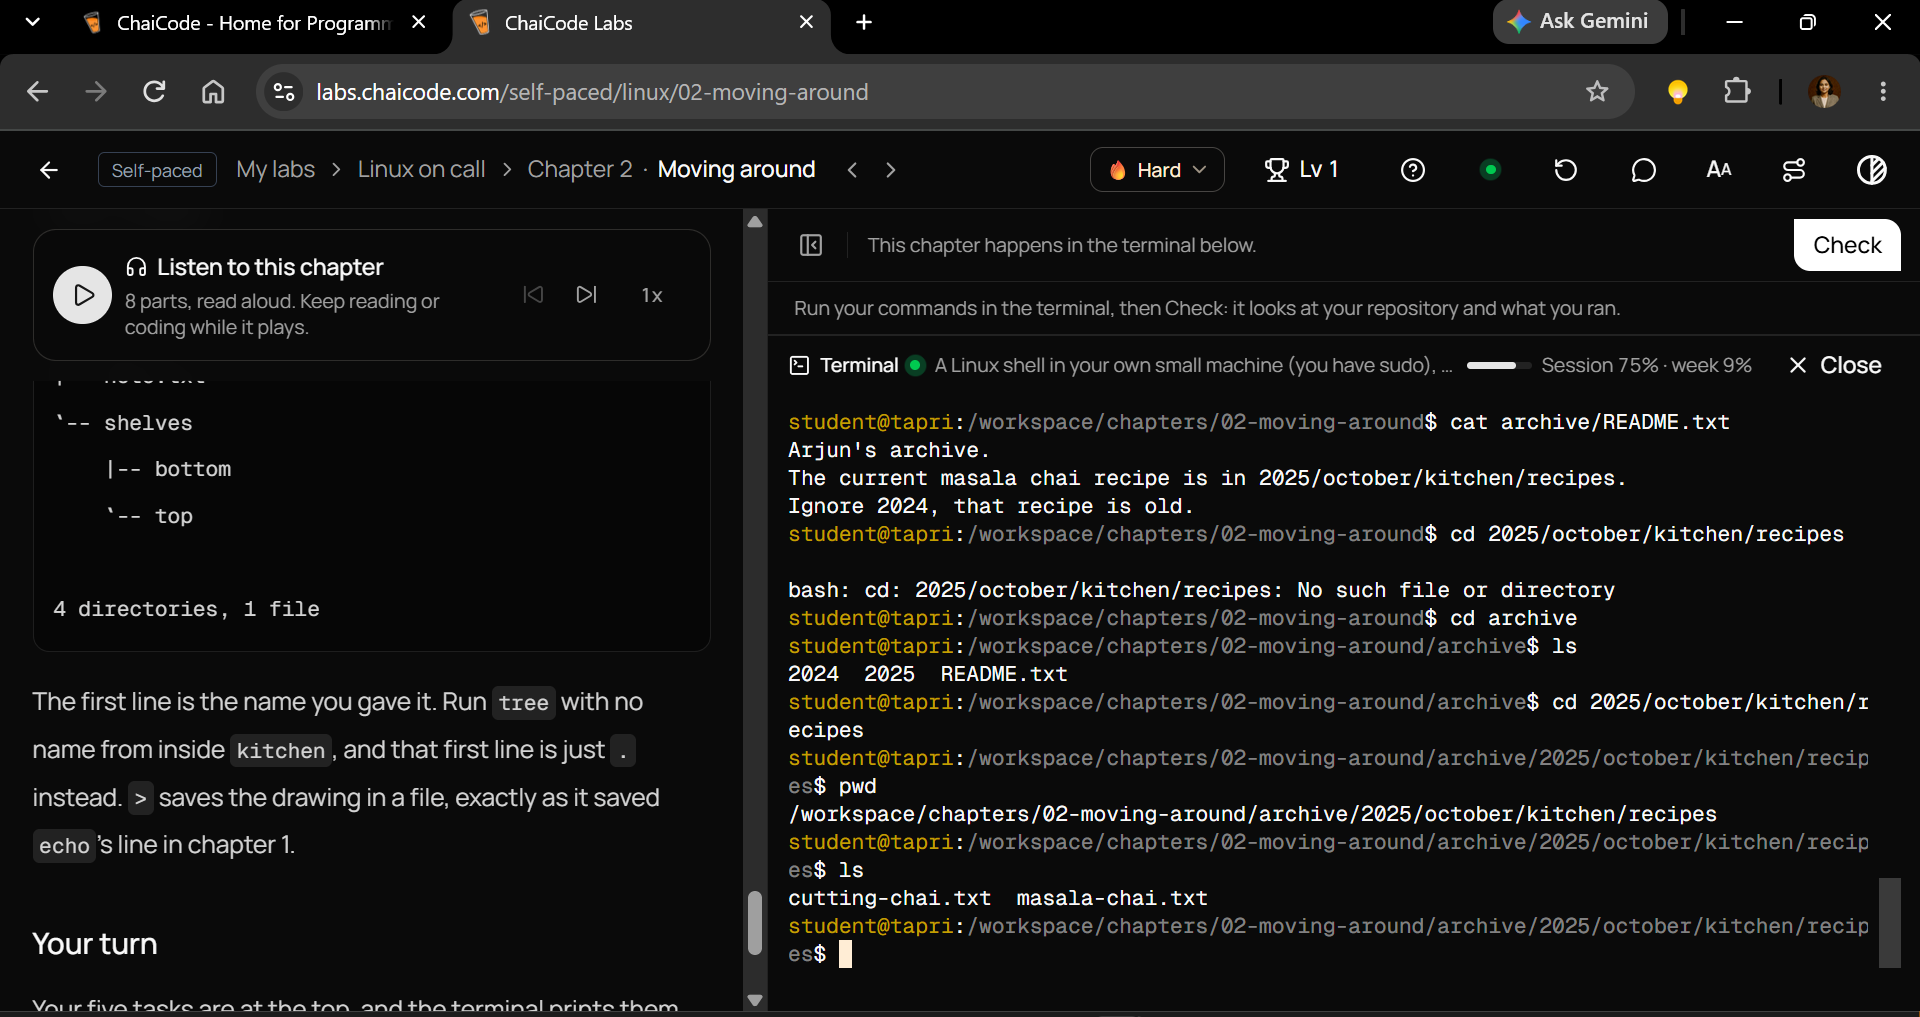
Run:
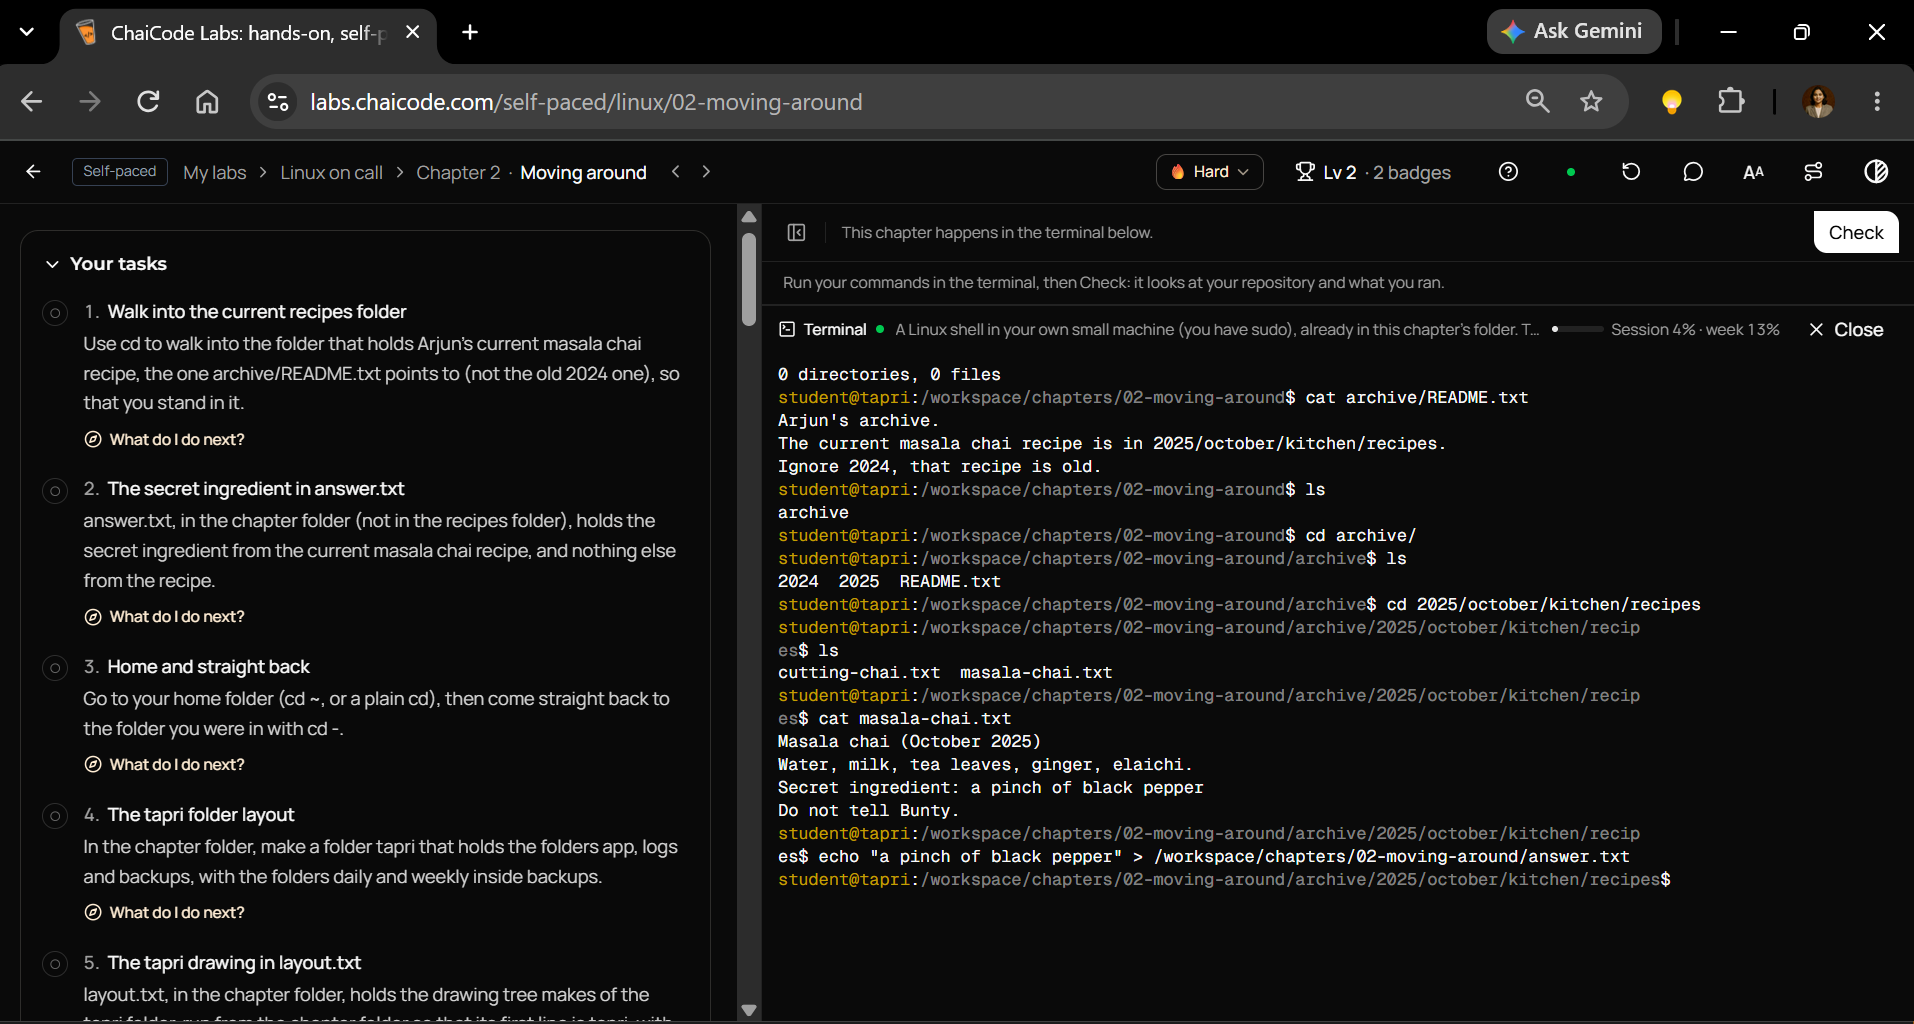
cat archive/README.txt
This README identifies which recipe should be used.
Read it carefully.
The objective is to find the current recipe, not simply the first file that looks relevant.
Step 3: Navigate to the Correct Recipe Directory
Use the path identified in the README.
For example, the command structure is:
cd <current-recipe-directory>
2025/october/kitchen/recipes
cd 2025/october/kitchen/recipes
/workspace/chapters/02-moving-around/archive/2025/october/kitchen/recipes
Here, <current-recipe-directory> is a placeholder. Replace it with the actual directory path indicated by the README.
Then verify:
pwd
ls
Use cat to read the actual recipe file once you've identified its name.
The lab's current recipe path and secret ingredient need to be obtained from your own terminal session. We shouldn't guess either one.
This is what makes the exercise valuable.
You're not following a memorized path.
You're using information from one file to determine your next action.
That's exactly how real technical troubleshooting works.
Before making a decision, inspect the available evidence.
5. Where Does a File Actually Go? Understanding Relative Paths
Here's where Linux starts getting interesting.
Suppose you've found the secret ingredient.
Now you need to save it in a file called:
answer.txt
Sounds easy.
But there's a condition.
The file must be created in the chapter directory, not inside the recipe directory.
This is where beginners often make mistakes.
Consider:
echo "SECRET_INGREDIENT" > answer.txt
If you're standing deep inside the recipe directory, answer.txt will be created there.
Not in the chapter folder.
Because answer.txt is a relative path.
The Rule You Must Remember
A relative path is resolved from your current working directory.
Let's demonstrate using the lab's example directory structure.
First, create and enter a nested directory:
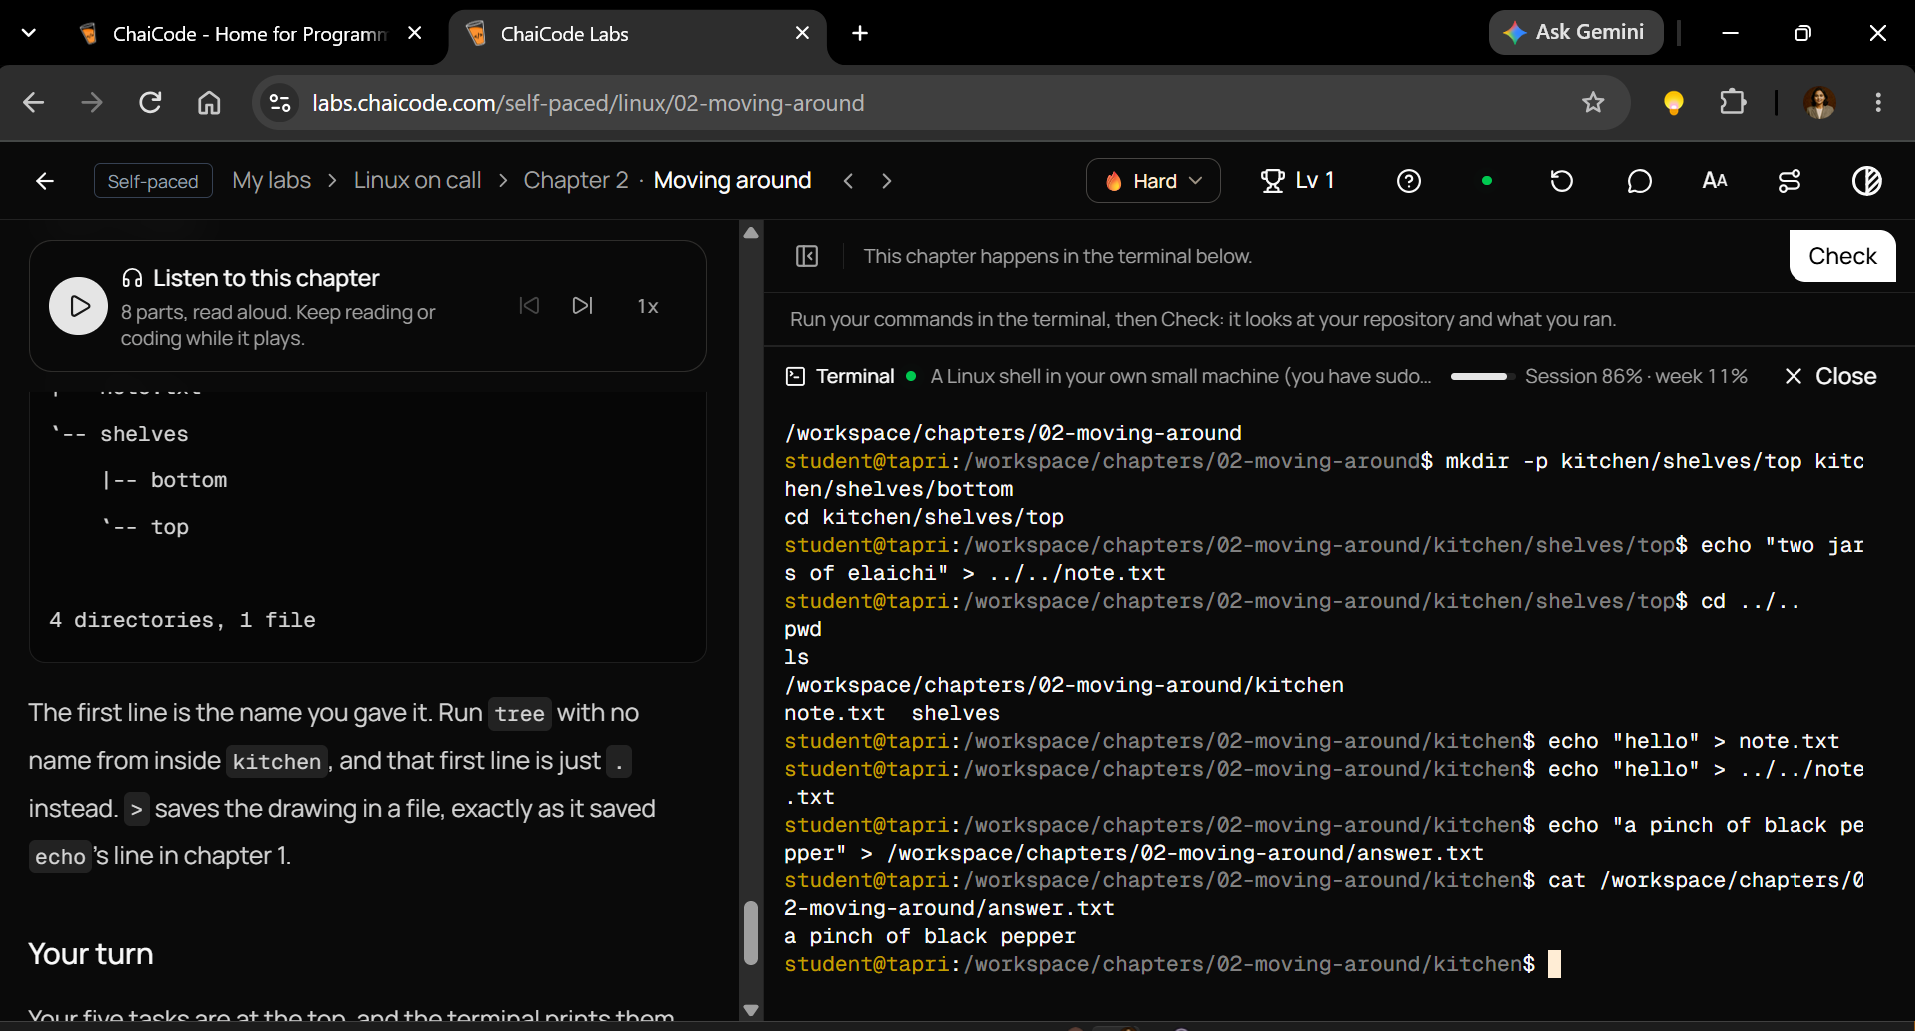
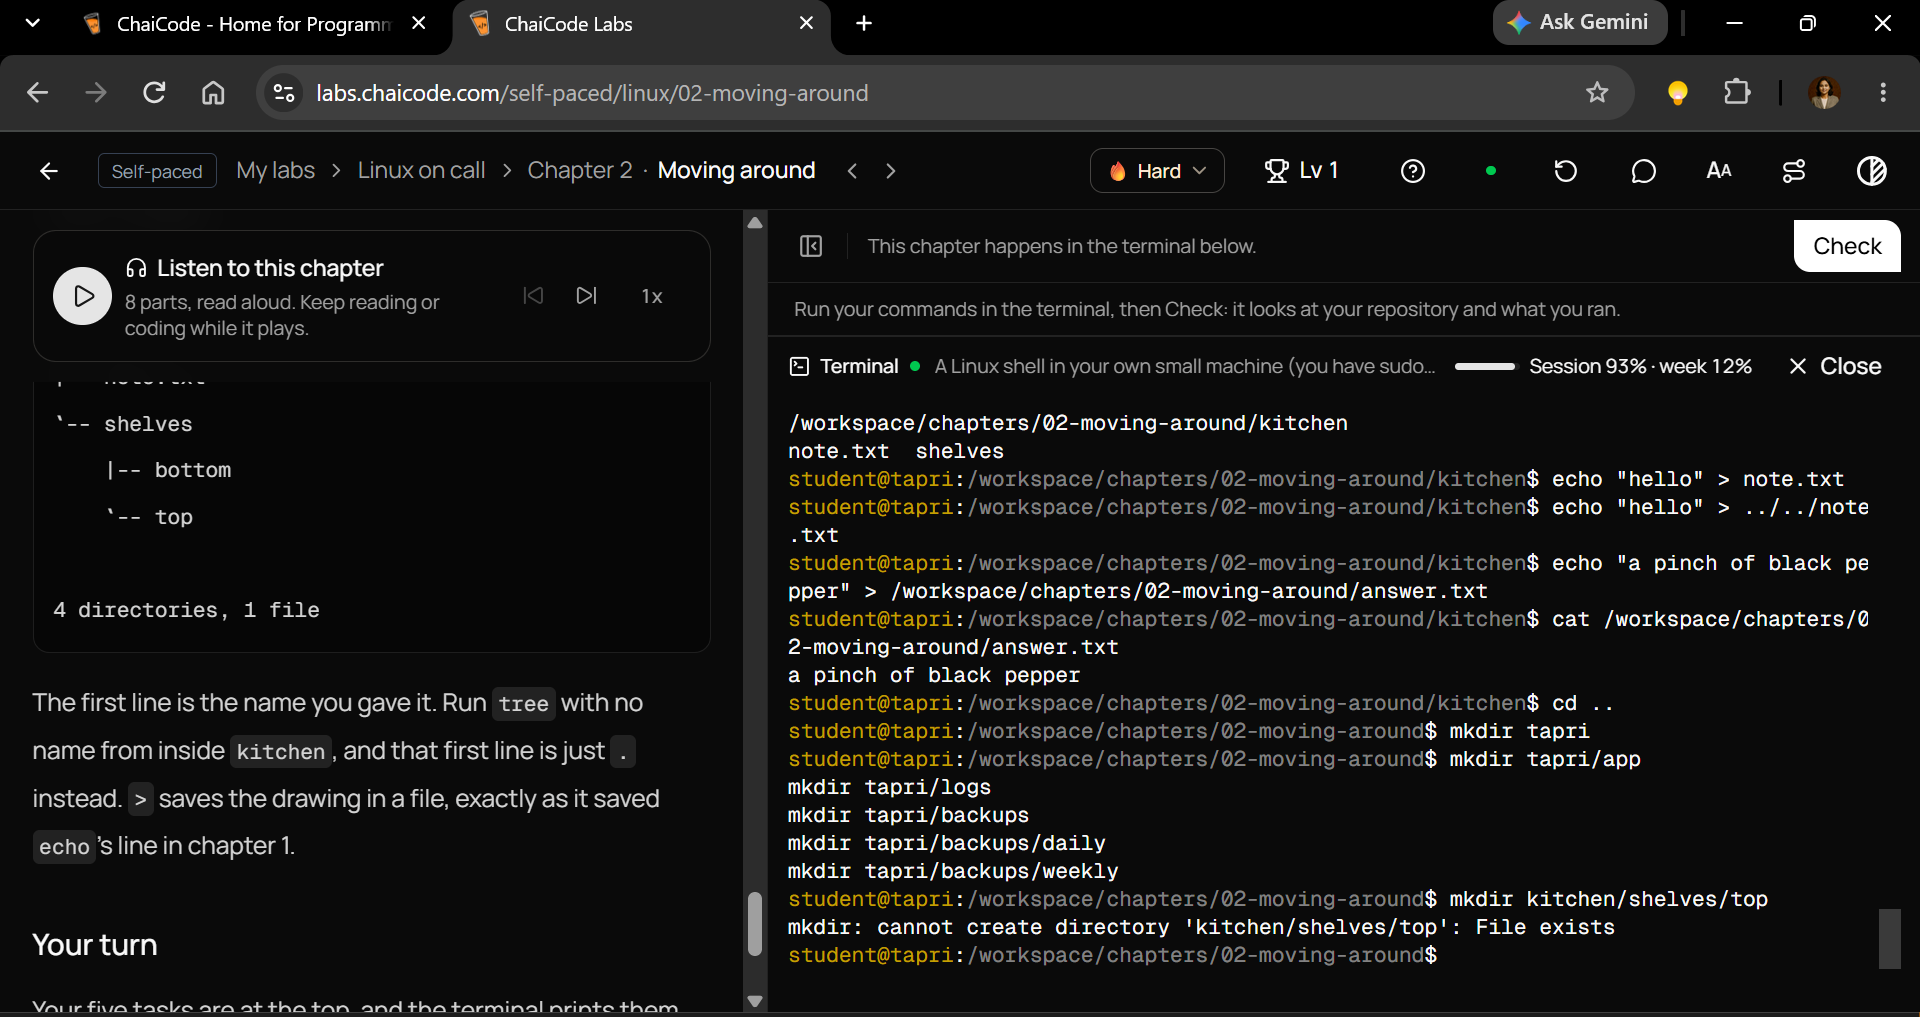
mkdir -p kitchen/shelves/top kitchen/shelves/bottom
cd kitchen/shelves/top
Now run:
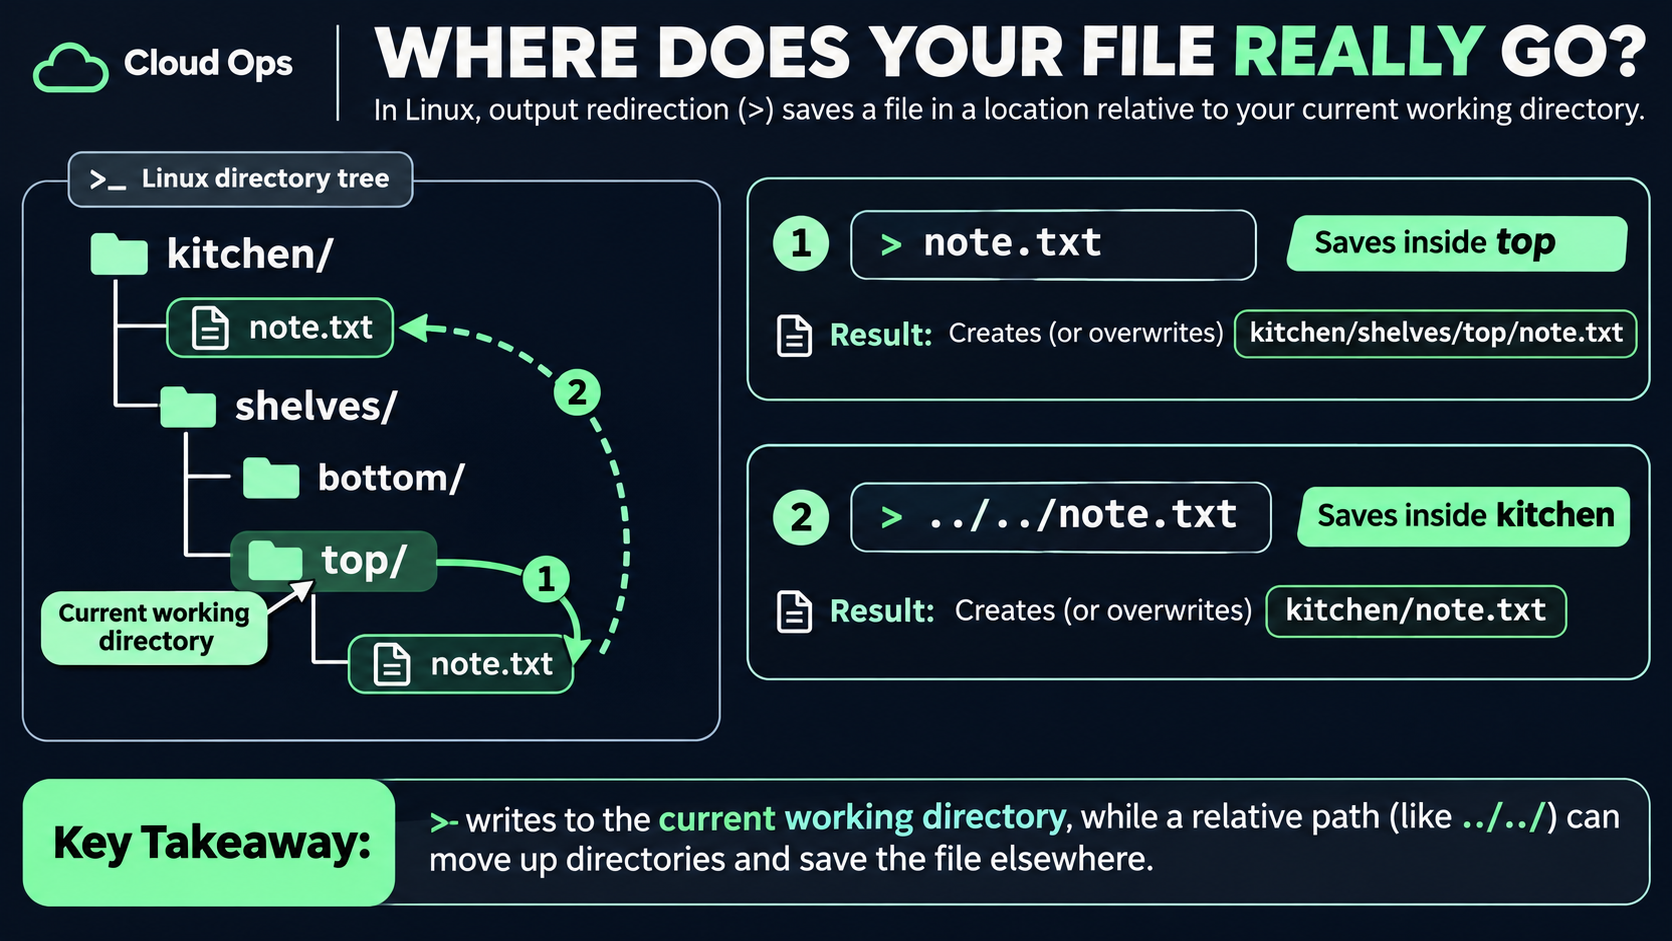
echo "two jars of elaichi" > ../../note.txt
Where does note.txt go?
Not inside top.
The ../.. moves the target path two directories upward.
Starting from:
kitchen/shelves/top
One .. leads to:
kitchen/shelves
The second .. leads to:
kitchen
So note.txt is saved inside kitchen.
Verify:
cd ../..
pwd
ls
In the lab example, the output is:
/workspace/chapters/02-moving-around/kitchen
note.txt  shelves
Now consider the difference between these two commands:
echo "hello" > note.txt
And:
echo "hello" > ../../note.txt
They can write to completely different locations.
The text is the same.
The filename is the same.
But the path changes the destination.
How to Save the Secret Ingredient Safely
For the lab, you can use an absolute path:
echo "ACTUAL_SECRET_INGREDIENT" > /workspace/chapters/02-moving-around/answer.txt
a pinch of black pepper
echo "a pinch of black pepper" > /workspace/chapters/02-moving-around/answer.txt
Replace ACTUAL_SECRET_INGREDIENT with the exact ingredient from the current recipe.
That command explicitly targets the chapter directory, regardless of your current working directory.
Verify it:
cat /workspace/chapters/02-moving-around/answer.txt
The file should contain the ingredient and nothing else from the recipe.
Cloud Ops lesson: The right information saved in the wrong directory can still break a workflow.
Think about applications that expect configuration files, credentials, or deployment artifacts in specific locations.
A file can exist and still be effectively missing to a program looking somewhere else.
6. mkdir vs mkdir -p: Build Directory Structures Without Repeating Yourself
The second part of the lab introduces a practical infrastructure task.
Kabir needs a directory layout for the Tapri application.
The required structure is:
tapri/
├── app/
├── backups/
│   ├── daily/
│   └── weekly/
└── logs/
Let's break down why this matters.
An application needs a predictable place for its files.
Logs need somewhere to live.
Backups need an organized structure.
And the entire layout should be easy to understand.
The Traditional Approach
Linux uses mkdir to create directories.
For example:
mkdir tapri
Creates a directory called tapri.
Then:
mkdir tapri/app
mkdir tapri/logs
mkdir tapri/backups
mkdir tapri/backups/daily
mkdir tapri/backups/weekly
This works.
But it's repetitive.
And you have to create parent directories before their children.
What Happens When Parent Directories Don't Exist?
Try:
mkdir kitchen/shelves/top
If kitchen and shelves don't exist, you'll receive an error:
mkdir: cannot create directory 'kitchen/shelves/top': No such file or directory
The problem?
mkdir cannot create that nested directory because its parent directories are missing.
The Better Approach: mkdir -p
Now try:
mkdir -p kitchen/shelves/top kitchen/shelves/bottom
The -p option means parents.
It tells mkdir to create any missing parent directories needed along the path.
It also tolerates parent directories that already exist.
One command creates:
kitchen/
└── shelves/
    ├── bottom/
    └── top/
That's four newly created directories.
No need to create each one manually.
Build the Tapri Directory Layout
First, make sure you're in the chapter directory:
cd /workspace/chapters/02-moving-around
Then run:
mkdir -p tapri/app tapri/logs tapri/backups/daily tapri/backups/weekly
That's it.
One command creates the required structure.
You can also use Bash brace expansion:
mkdir -p tapri/{app,logs,backups/{daily,weekly}}
Both approaches produce the same required layout in Bash.
The explicit-path version is easier to understand as a beginner, while brace expansion becomes useful as you get more comfortable with shell syntax.
The engineering principle: Build repeatable processes, not repetitive tasks.
Infrastructure automation depends on the same mindset.
When you can describe a predictable directory structure with one command, you're already thinking in the direction of automation.
7. tree: See Your Entire Linux Directory Structure at Once
Creating directories is one thing.
Understanding their layout is another.
That's where tree comes in.
The command:
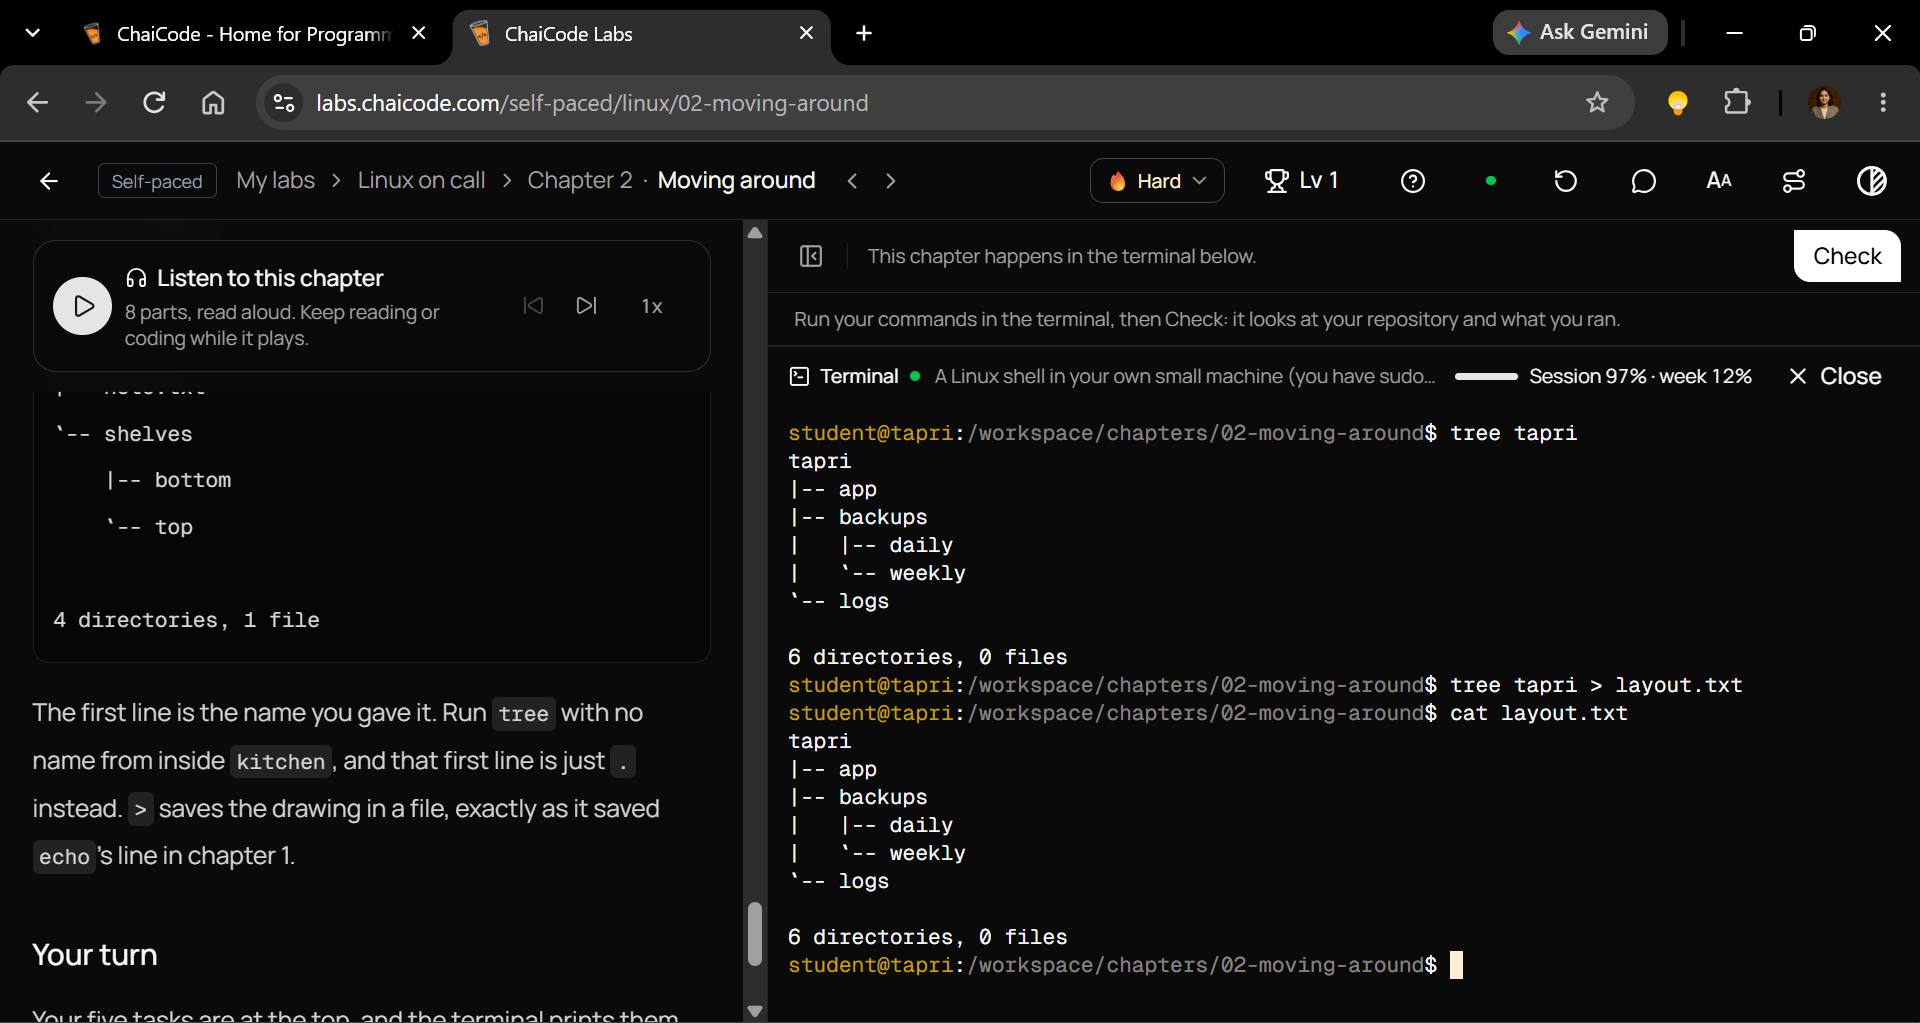
tree tapri
Displays the directory structure in a hierarchy.
Expected output after creating the required folders:
tapri
├── app
├── backups
│   ├── daily
│   └── weekly
└── logs

6 directories, 0 files
Notice how much information this gives you.
You can immediately see that:
appis directly insidetapri.logsis also directly insidetapri.backupscontainsdailyandweekly.- The structure contains six directories and no regular files.
That's much easier to understand than examining each folder separately.
Why the First Line Matters
Here's an important detail from the lab.
If you run:
tree tapri
The first line is:
tapri
But if you move inside tapri and run:
tree
The first line is usually:
.
That dot represents the current directory.
The same folder structure can produce different-looking output depending on where you run the command and which path you provide.
Context matters even when you're only displaying information.
Save the Directory Tree to a File
The lab asks you to create a file called:
layout.txt
It must contain the output from tree tapri, including the final directory-count summary.
First, return to the chapter folder:
cd /workspace/chapters/02-moving-around
Then run:
tree tapri > layout.txt
The > operator redirects the output into layout.txt.
Now verify:
cat layout.txt
The file should contain the tree drawing, beginning with tapri and ending with:
6 directories, 0 files
You have now created a directory structure and documented it using Linux commands.
That might seem like a small achievement.
But it connects directly to real-world engineering.
Directory layouts are part of how applications organize data, logs, backups, and deployment assets.
A clear directory structure helps engineers understand where information belongs.
8. Putting Everything Together: The Five ChaiCode Lab Tasks
Now let's connect everything we've learned.
This chapter isn't simply about memorizing commands.
It's about completing a real workflow.
Task 1: Navigate to the Current Recipe
Start by inspecting:
cat archive/README.txt
Find the current recipe location, avoiding the outdated 2024 version.
Navigate into its directory using cd, then use pwd to confirm your location.
Task 2: Save the Secret Ingredient
Read the correct recipe.
Identify the actual secret ingredient.
Save only that ingredient into the chapter's answer.txt file.
Example command structure:
echo "ACTUAL_SECRET_INGREDIENT" > /workspace/chapters/02-moving-around/answer.txt
echo "a pinch of black pepper" > /workspace/chapters/02-moving-around/answer.txt
Use the ingredient shown by your lab, not the placeholder.
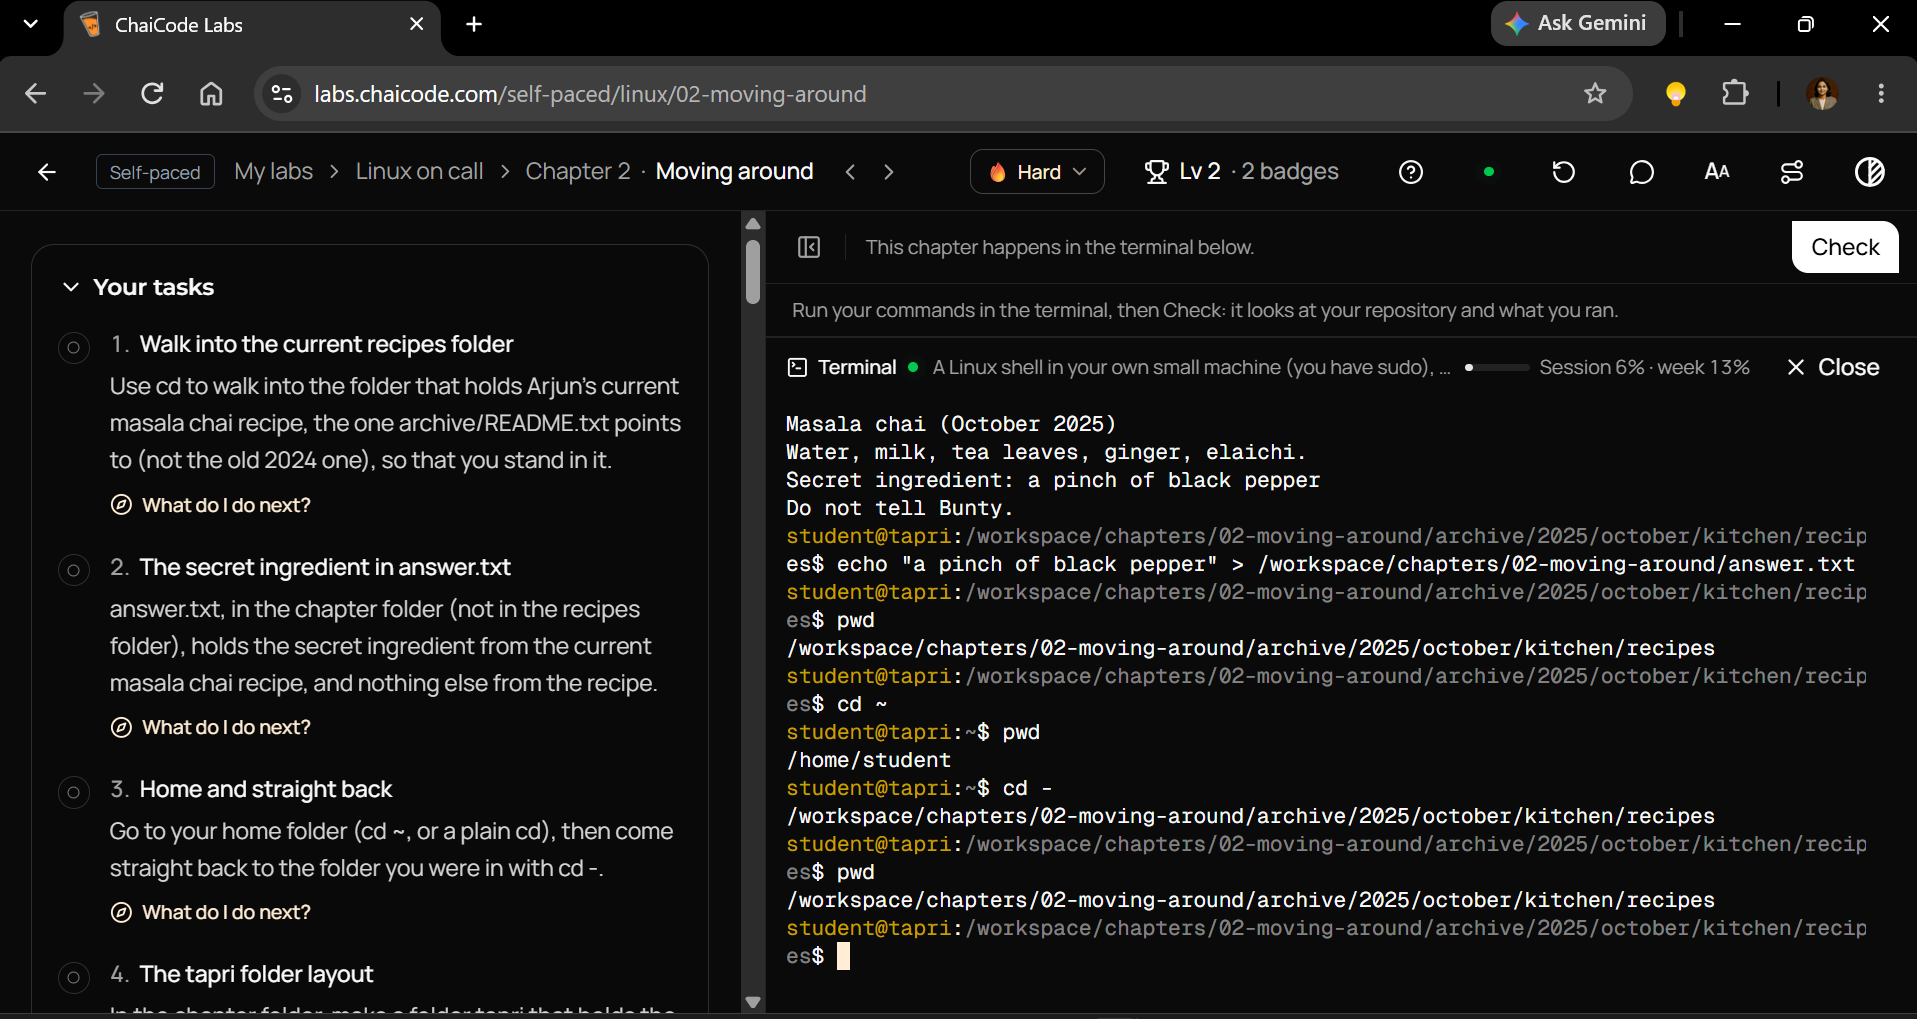
Task 3: Go Home and Come Straight Back
While standing in the current recipe directory, run:
cd ~
pwd
cd -
pwd
The first pwd should show the home directory.
The second should show the recipe directory you were in before going home.
This demonstrates the behavior of cd ~ and cd -.
Task 4: Create the Tapri Directory Structure
Return to the chapter directory:
cd /workspace/chapters/02-moving-around
Create the required folders:
mkdir -p tapri/app tapri/logs tapri/backups/daily tapri/backups/weekly
Task 5: Save the Directory Tree
From the chapter directory, run:
tree tapri > layout.txt
cat layout.txt
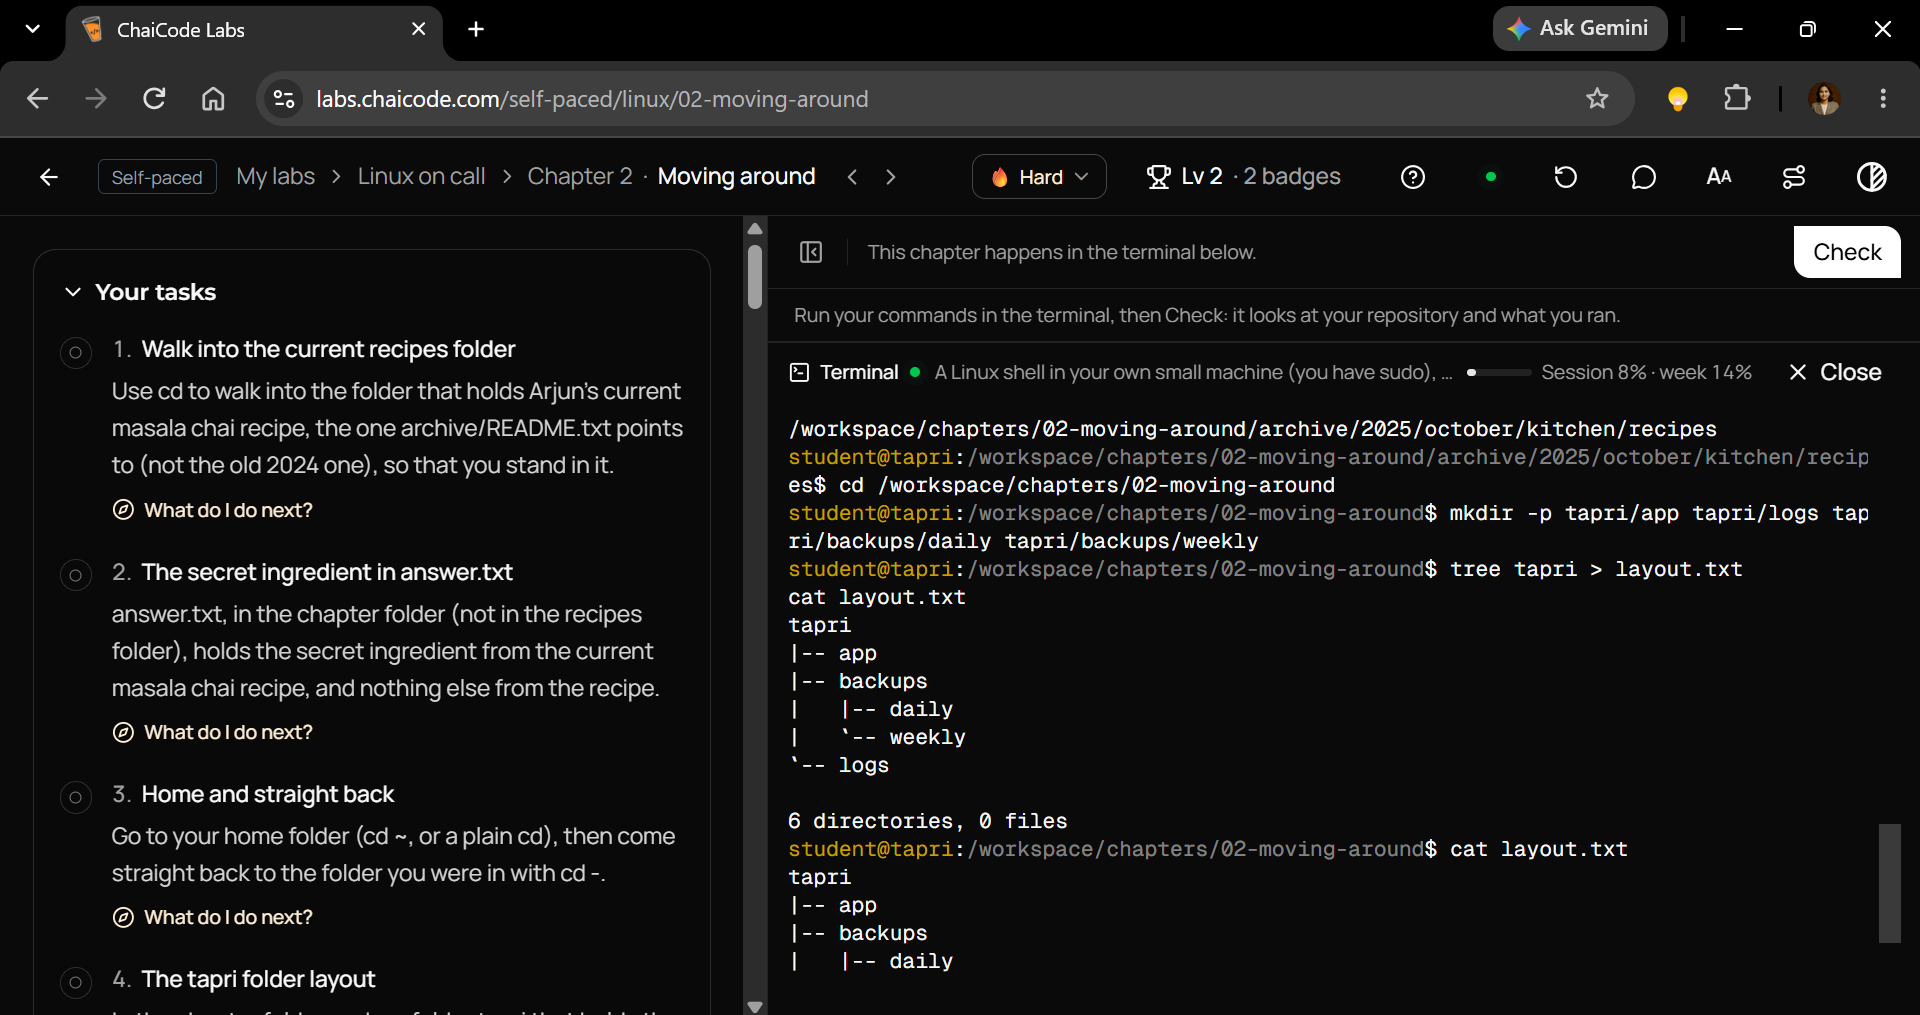
Verify that the tree begins with tapri and includes the summary line.
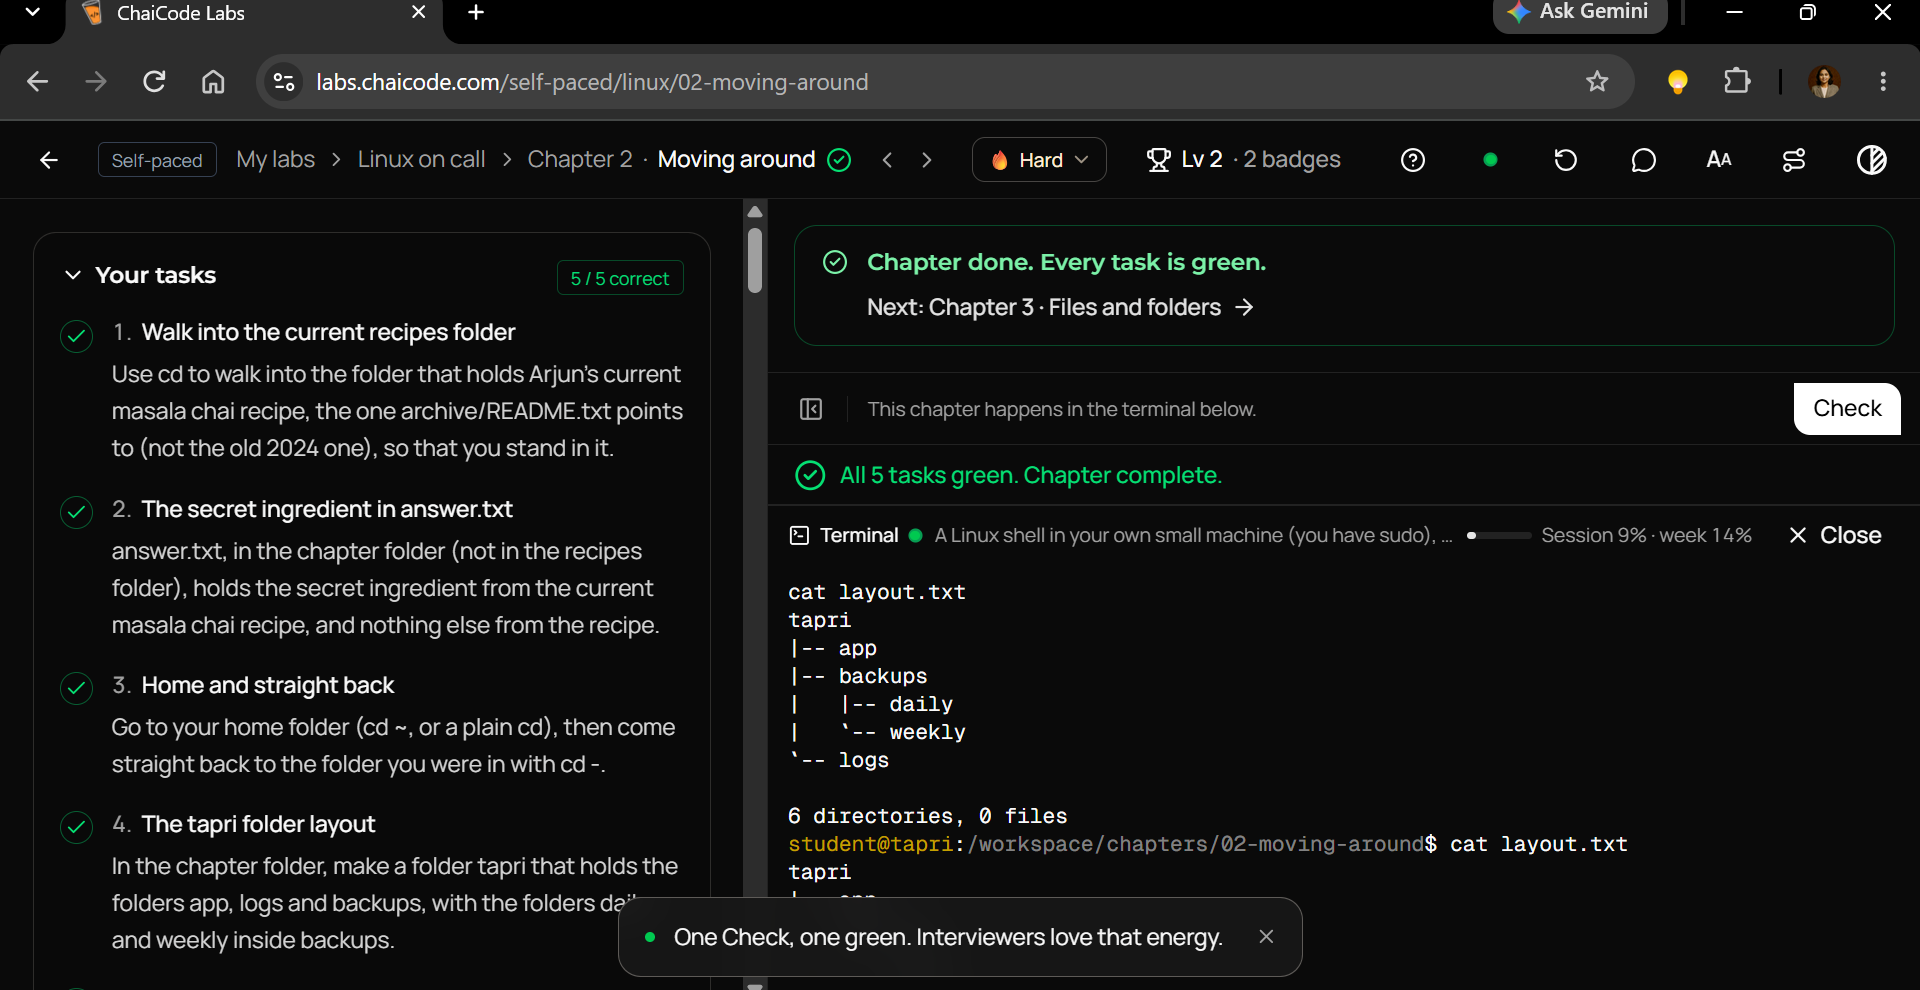
You've now practiced directory navigation, identifying current information, controlling file destinations, creating nested directories, and documenting filesystem structure.
9. The Cloud Ops Connection: Why Directory Navigation Matters
Let's move beyond the lab for a moment.
Imagine you're investigating an application that stopped working after a deployment.
Someone tells you:
"The configuration file is definitely there."
But the application can't find it.
What's the problem?
Maybe the file exists in a different directory.
Maybe a script assumes the wrong working directory.
Maybe an output file was written into a temporary folder instead of its intended location.
Or maybe the deployment process never created a required directory.
These are examples of why basic Linux navigation is useful in Cloud Ops.
Consider how Chapter 2's commands connect to common engineering tasks.
| Linux concept | Practical Cloud Ops application |
|---|---|
cd |
Navigate application and server directories |
pwd |
Confirm a script or terminal's working directory |
cd .. |
Move through nested directories |
cd ~ |
Return to the user's home directory |
cd - |
Switch between two working locations |
mkdir -p |
Create directory structures during setup |
tree |
Inspect and document a directory hierarchy |
| Relative paths | Reference files from a known working directory |
| Absolute paths | Target a specific location regardless of working directory |
The value isn't in knowing that these commands exist.
It's in understanding when to use each one.
A reliable engineer doesn't simply execute commands. They understand where those commands will act.
10. Five Mistakes Linux Beginners Should Avoid
The biggest Linux mistakes don't always involve complicated commands.
Sometimes they come from misunderstanding simple ones.
Mistake 1: Forgetting the Current Working Directory
You save a file, but it appears in the wrong place.
Better habit: Run pwd before creating important files.
Mistake 2: Using cd on a Regular File
You try:
cd archive/README.txt
But cd expects a directory.
Better habit: Use cat to read text files and cd to navigate directories.
Mistake 3: Assuming cd - Rewinds Your Entire Navigation History
It doesn't.
It switches to the immediately previous working directory.
Better habit: Understand the difference between a previous location and a complete navigation history.
Mistake 4: Creating Nested Directories Without -p
You run:
mkdir project/logs/daily
But project and logs don't exist yet.
Better habit: Use mkdir -p when you need missing parent directories created.
Mistake 5: Running tree from the Wrong Location
You create a correct folder structure but save an output that begins with . instead of the requested directory name.
Better habit: Check your working directory and provide the correct path to tree.
11. Linux Interview Questions From Chapter 2
Whether you're learning Linux for Cloud Engineering, DevOps, or system administration, these foundational concepts are worth understanding.
Q1. What does the cd command do?
cd changes the shell's current working directory.
Q2. What's the difference between cd .. and cd -?
cd .. moves to the parent directory.
cd - switches to the previous working directory.
Q3. What does cd ~ do?
It moves to the current user's home directory.
Q4. What does mkdir -p do?
It creates the specified directory and any missing parent directories along its path.
Q5. What's the difference between relative and absolute paths?
A relative path is interpreted from the current working directory.
An absolute path begins at the filesystem root, /.
Q6. How can you display a directory hierarchy in Linux?
Use the tree command:
tree foldername
Q7. How can you save the output of tree to a text file?
Use output redirection:
tree foldername > layout.txt
Q8. What is the difference between tree and ls?
ls lists directory contents, normally one directory level at a time.
tree displays a recursive, hierarchical view of directories and files.
Q9. What happens if you run cd without arguments?
It changes to the user's home directory.
Q10. Why should you verify your current directory before redirecting output?
Because a relative output path is interpreted from the current working directory. Without verification, you might create or overwrite a file in an unintended location.
12. The Bigger Lesson: Know Where You're Standing Before You Act
Chapter 1 taught us how to inspect a Linux server.
Chapter 2 teaches us how to move around it and organize what we find.
And that progression matters.
You can't reliably manage a system if you don't understand its directory structure.
You can't confidently automate file operations if you don't understand relative paths.
You can't safely create project layouts if you don't understand parent directories.
And you can't troubleshoot efficiently if you don't know where you are.
The commands in this chapter are simple:
cd
pwd
mkdir -p
tree
But they teach a deeper engineering habit:
Know your location. Understand your target. Execute deliberately. Verify the result.
That's not just a Linux lesson.
It's an operational principle.
The same mindset applies when working with containers, cloud servers, deployment scripts, and infrastructure tooling.
Final Takeaway: Small Commands, Strong Foundations
The biggest lesson from Chapter 2 isn't that cd changes directories or that mkdir -p creates nested folders.
It's that where you execute a command matters just as much as the command itself.
In this lab, we learned to find the correct recipe, save its secret ingredient in the required location, return to a previous directory, build a structured application folder, and document its hierarchy.
Each task builds a small but useful piece of Linux fluency.
And that fluency becomes valuable as infrastructure tasks get more complex.
My biggest takeaway?
Cloud Engineering isn't about knowing the most commands. It's about understanding the consequences of the commands you run.
Start small.
Build the right habits.
Then build bigger systems.
Practice This Chapter Yourself
Hands-on lab: ChaiCode Chapter 2 — Moving Around
Full learning track: Linux on Call
Browse more labs: ChaiCode Labs
Previous article: Your First Linux Login: 6 Commands Every Future Cloud Engineer Must Know
Continuing the Series
This article is part of:
Linux on Call: From Beginner to Cloud Engineer | ChaiCode Labs
I'm documenting Linux and Cloud Ops fundamentals through practical labs, real-world scenarios, terminal examples, diagrams, and engineering takeaways.
The goal is straightforward: build a stronger technical foundation, one chapter at a time.
Have you ever accidentally created a file in the wrong Linux directory? What helped you catch the mistake?
Share your experience in the comments. Real troubleshooting stories are often the best learning resources.
Open to Cloud Ops Remote and technical writing projects.
Comments
Join the discussionNo comments yet. Be the first to comment.
Linux on Call: From Beginner to Cloud Engineer | ChaiCode Labs
Learn Linux from the ground up through hands-on ChaiCode Labs and real-world Cloud Ops scenarios. This series documents my journey from Linux beginner to cloud engineer, covering essential commands, filesystem navigation, server administration, permissions, troubleshooting, shell scripting, and practical DevOps skills. Each chapter includes step-by-step tutorials, terminal examples, screenshots, visual diagrams, interview questions, and lessons you can apply to real Linux servers. Learn by doing. Troubleshoot with confidence. Build real Cloud Ops skills.